VOGONS


First post, by dos-moe

User metadata
Rank Newbie
Rank
Newbie

Hello guys!
I am a new member to this forum. My name is Moe and I am from germany. My english my not be perfect. Sorry.

A current project is one of my many retro mainboards trying to repair it.
It's a 286 rev 2.0 NEAT mainboard from the brand Peacock.

So far:
I was able to fix all broken traces ( I guess). On the photos below, it looks like a mess on a closer look 😀
I partly removed a ISA slot, to be able to clean and repair the broken traces. I replaced the CPU socket and some caps next to the power connection (P8, P9).
At the moment a 25mhz CPU is installed. The board can start with Quartz Crystal Oscillator from 24 to 48mhz.

Now to the problems. The sympthoms are:
After powering up, the display stays black and the post analyser card shows the digits 06, which stands for "initialized system hardware". Then I have to wait about 10 seconds, then pressing the reset button and the system comes to life. It posts on screen and the analyser card shows the code 35, which means I can enter the setup.
But as soon as I try to set up a HDD (Type 49 , 504mb), after rebooting the screen stays black and the post analyser card stops at the code 06 again. This happens with different ISA HDD controller cards. Pressing the reset button doesn't help. The board just stops working at this point and seems to be stuck.

At this point is my personal limit. I am not a electrician, just a retro hardware hobbyist. So I need your help. What could cause this issue? I own a soldering station, a multimeter and a multi function tester for components.

The mainboards front side:
https://link.shutterfly.com/XQRPXAVVPBb

Repaired traces:
https://link.shutterfly.com/H90GhAXVPBb

Mainboard with ISA cards installed + hdd adapter with SD-card:
https://link.shutterfly.com/FtZvEh4VPBb

Sticker with Rev 2.0 NEAT-286 on the backside:
https://link.shutterfly.com/IEL2MFZVPBb

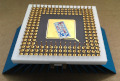
CPU socket backside pins:
https://link.shutterfly.com/kTZ1ML1VPBb

Chipset:
https://link.shutterfly.com/xcH5eA2VPBb

Post analyser card showing code 06:
https://link.shutterfly.com/JRY9Nk3VPBb

Post analyser card showing code 35:
https://link.shutterfly.com/Rk1hpI5VPBb

Boot Screen:
https://link.shutterfly.com/j285Um6VPBb

Setup pace one. It shows 65535kb of extended memory with 4mb installed!? Maybe that is a sign for the error source...
https://link.shutterfly.com/3iqMlt8VPBb

Page two of the setup screen:
https://link.shutterfly.com/RRrutAgWPBb

Post analyser codes explained (06 for Phoenix bios):
https://link.shutterfly.com/m2ZWsuiWPBb

My tools:
https://link.shutterfly.com/Y27Ml1jWPBb

Thank you very much!

Reply 1 of 13, by jakethompson1

User metadata
Rank l33t
Rank
l33t

Just to get simple things out of the way, how are you powering the real time clock ("CMOS RAM") since the battery is removed?
Seems like part that could get flaky between cold vs. warm boot...

Reply 2 of 13, by dos-moe

User metadata
Rank Newbie
Rank
Newbie

Just connected a external battery. Same result. 🙁

Reply 4 of 13, by Nexxen

User metadata
Rank l33t
Rank
l33t

Did you try different slots? Move cards and test if one combination works.

Last edited by Nexxen on 2023-07-31, 14:31. Edited 1 time in total.

PC#1 Pentium 233 MMX - 98SE
PC#2 PIII-1Ghz - 98SE/W2K

- "One hates the specialty unobtainium parts, the other laughs in greed listing them under a ridiculous price" - kotel studios
- Bare metal ist krieg.

Reply 5 of 13, by Deunan

User metadata
Rank l33t
Rank
l33t
dos-moe wrote on 2023-07-29, 20:04:

A current project is one of my many retro mainboards trying to repair it.
It's a 286 rev 2.0 NEAT mainboard from the brand Peacock.

There might be more corrosion on the PCB, especially under that white power connector. You might have to desolder it to make sure / repair any damage, and even before you do that please check the POWER GOOD signal pin and try to figure out where it goes. Unlike other pins on the power connector this one is pure signal (not power), has little copper and is easily "eaten" completly by the spill.

If you have no experience removing parts from multi-layer PCBs you can experiment on some other ones first, and perhaps first try to establish where each signal goes just by looking at the traces, and using an ohm meter.

Oh in general you want to clean the flux after any soldering job - most modern fluxes are not very active (so not really corrosive at room temperature) but if you clean the PCB you can have a better look at the results of the repair job. Buy a bottle of 100% clean IPA for this task. Anything lower than 100% might be used too but remember that the remaining % is contamination, usually water with sulfric acid, it smells bad and might be a bit corrosive, so I would not go below 95% unless you can't get anything else (during COVID days all good IPA was used for disinfection and got stupidly expensive, might still be in come countries).

Reply 6 of 13, by dos-moe

User metadata
Rank Newbie
Rank
Newbie

Good evening!
Thanks for all your advices.
Tried with a external battery conected and tried different ISA slot combos. Same problems...
Floppy drive is recognized, but it does not read the disk. Maybe my floppy drive is to dirty. Will try another one.

Removing small parts is not a problem for me. Already removed the power connectors and cleaned below.
Deunan, your hint helped me. I just figured out that my PSU does not deliver -5V. So no -5V on the outer thick trace. I think it's because it's a ATX PSU with a AT adapter. Will test tomorrow with a real AT PSU.
Btw I always clean broken traces with a toothbrush soaked with white vinegar. After that I brush it with isopropanol and the last step is covering the fixed traces with transparent nail polish. That might look like flux, but it isn't.
I will tell you the latest results as soon as possible.
So thank you very much so far!

Reply 7 of 13, by Deunan

User metadata
Rank l33t
Rank
l33t
dos-moe wrote on 2023-07-30, 20:35:

I just figured out that my PSU does not deliver -5V.

This should not be a problem. Only some sound cards require -5V, and rarely some VGAs as well but it's for DAC so if you have a good picture on the screen you know the card does not need -5V.

Try to keep the VGA in either the first or the last slot, many of these mobos have some issues with ISA signals and VGA cards seem to be most affected. For some 286 mobos the manual will even clearly state that the graphics card must be installed in specific slot.

There should be a LED for reset signal on ISA bus on your POST card. Is it changing state when you press reset button? The LED should also not go off right after you apply power, but with some small delay (about 1/4 of a second, might be more). This is how you know the POWER GOOD signal is reaching the mobo.

The weird memory detection (it also says there is no base memory, but should instead be showing 640k) might also be a clue that there is something wrong with the RAM sticks. Can you test them in another system? Or try different ones? A mobo like this should work with just 2 sticks so maybe try to swap them around in case just one is bad and it happens to be the one in the first 1MB.

Reply 8 of 13, by dos-moe

User metadata
Rank Newbie
Rank
Newbie

Hi Deunan,

thanks for the information about the -5V.

As you wrote I tried that pluggin in the VGA card in the last slot (first one is destroyed). Problem remains.
The LED for reset is doing that, what you wrote. So there is a Power Good signal.

I changed the memory back to the original ones, that came with the board. Same problems...
But I recognized something new. It doesn't matter what setting I try to save in bios, even the time for example, it always leads to the main issue -> no posting and the 06 error on the analyser card. So maybe the CMOS ram chip is defect?! Could that be possible? How can I test its functionality with a multimeter?
Best regards!

Reply 9 of 13, by jakethompson1

User metadata
Rank l33t
Rank
l33t

Can you image your BIOS and post it somewhere? It might explain what happens between 06 and the next POST code that isn't working.
I think your RTC is built into the chipset on that board, so it isn't a discrete part you can swap out.
There is a CMOS Shutdown Register that tracks the reason why the CPU is reset (needed to get the 80286 out of protected mode among other things). I guess if something is wrong with the CMOS RAM, or more likely something wrong with how it is being powered due to corroded traces around the battery, perhaps that could be related. That could be why a reset button vs. soft reboot gives different results.

Reply 10 of 13, by Deunan

User metadata
Rank l33t
Rank
l33t
dos-moe wrote on 2023-07-31, 19:50:

But I recognized something new. It doesn't matter what setting I try to save in bios, even the time for example, it always leads to the main issue -> no posting and the 06 error on the analyser card. So maybe the CMOS ram chip is defect?! Could that be possible? How can I test its functionality with a multimeter?

Your mobo has RTC and CMOS NVRAM built into the chipset. But perhaps that section is not getting power - usually when PSU is running the RTC is powered from +5V line, and from battery when offline. This is done via 2 diodes (3 if the battery is also charged from PSU). Sometimes this requires a jumper on the external battery connector but it depends on the mobo. Some require jumper, some don't, and on some the jumper is doing CMOS clear instead (and should be removed before applying PSU power).

Try connecting external battery to the 4-pin connector near the keyboard port. One of the side pins is GND (check which one it is) and the opposite will be + of the battery. You can use a battery pack of 3 AA or AAA cells (2 might also work, as well as 4). See if that changes anything.

Reply 11 of 13, by dos-moe

User metadata
Rank Newbie
Rank
Newbie

Hi jakethompson1,
here is a image of the bios.
https://easyupload.io/b82vq8
Password: bios
(link expires in 14 Days.)

Deunan,
I checked the Diodes, they are ok.
One thing I forgot to mention. When entering the bios, it shows a error message due the self test.
It says: "Incorrect configuration data in CMOS
Memory size in CMOS invalid
Hard Disk 1 failed initializiation".
That confirm the wrong memory
Sadly there is no manual of this board, so I don't know if Jumper on the battery connectors would work. I fear to damage more parts.

Reply 12 of 13, by Deunan

User metadata
Rank l33t
Rank
l33t
dos-moe wrote on 2023-08-01, 14:04:

Sadly there is no manual of this board, so I don't know if Jumper on the battery connectors would work. I fear to damage more parts.

In general when there is a battery spill you should always assume the problems are related to that. You repaired the traces, but did you check the vias? These often get corroded all the way through the mobo, so it's not always possible to repair them if the signal goes into middle PCB layers.

Check all the vias, if in doubt a nice way to repair those is to put a piece of thin wire through and solder it at both ends to the copper traces. Try to fill the hole with solder too, this might just connect to any middle layers as well. Other than that I don't have any more ideas.

Reply 13 of 13, by dos-moe

User metadata
Rank Newbie
Rank
Newbie

Thank you very much, Deunan!
I will try your advice.
If it doesn't work, I guess to stop that repair project for another one 😀
Regards!