VOGONS


First post, by CMB75

User metadata
Rank Member
Rank
Member

In 1985, the AMIGA 1000 set new standards for computing with its groundbreaking graphics, sound, and multitasking capabilities. Now, 40 years later, I'm bringing that legacy into the modern era with a custom-built system that pays tribute to the original while embracing some new possibilities.

My project combines a custom 3D-printed front bezel, a modified Checkmate 1500 case and a A500++ mainboard to create a machine that feels both classic and fresh. It's not a restoration - it's my reimagination of what an AMIGA 1000 could have been down the line, like an AMIGA 1000++.

I've started this project many times before but I got stuck somewhere along the way. But I guess the 40th anniversary is a good pressure point for me to finally get it done. I'll be honest - I don't know if I'll have it finished by July, and that uncertainty is a bit nerve-wracking. Anyways, I'm diving into this with passion, and I'd love to share my progress, challenges, and insights along the way. Let's celebrate four decades of AMIGA computing...

Reply 1 of 5, by CMB75

User metadata
Rank Member
Rank
Member

First update:

And the journey starts. Creating the necessary parts for this build in Autodesk Fusion, f.k.a. Fusion 360, has been an iterative process. Getting a design that is functional, structurally sound and precisely dimensioned isn't something you get right on the first try - at least I didn't! Each iteration has involved tweaking measurements, adjusting tolerances, and refining structural support to ensure the parts are not only accurate but also 3D printable on a resin printer.

The attachment A1000++ p4.8 - Autodesk Fusion.webp is no longer available

Resin printing introduces some specific constraints, such as overhangs, thin walls, and the need for proper support structures. Balancing these factors while maintaining an aesthetically pleasing design has required multiple test prints and adjustments. While the level of detail was satisfactory, warping and bending still became issues - especially on larger pieces. I found that adjusting the print orientation, adding more robust supports manually and modifying the curing process helped mitigate these problems.

Once the designs were finalized, I moved on to printing the final run in resin. Of course I ran into problems using my Anycubic printer - involuntarily freezing up from time to time. Following Murphy's law, it again froze after a couple of hours while printing the final part and I ran out of resin. Replacement resin has already been ordered but has not yet been delivered. Anycubic, a brand I will avoid when considering purchases in the future.

For curing, I used a 'wash and cure'-station as well as a DIY-UV lighting box, ensuring that parts were exposed evenly and not over-cured, which can lead to brittleness. Proper post-processing (cleaning, drying, and curing at the right times) has been essential in getting durable, precise components.

The attachment A1000++ p4.8 - printing & curing.webp is no longer available

There's still a long way to go, especially the failure to print the final part will postpone further progress a little while.

Anyways, looking forward to sharing more updates soon...

Reply 2 of 5, by Jo22

User metadata
Rank l33t++
Rank
l33t++

😃👍💙

"Time, it seems, doesn't flow. For some it's fast, for some it's slow.
In what to one race is no time at all, another race can rise and fall..." - The Minstrel

//My video channel//

Reply 3 of 5, by CMB75

User metadata
Rank Member
Rank
Member

Second update:

Bringing It All Together - assembling, test fitting and prepping for paint ... with my 3D-printed parts in hand, the next big step in my Amiga 1000++ project has been assembling them, test fitting everything onto the case and preparing for the final finish. As expected, this phase has been both exciting and a bit challenging, but that's all part of the process!

After carefully cleaning and curing my resin prints, it was time to glue them together and see how well they fit on the Checkmate 1500 case. Alignment is key here, so I used clamps and slow-curing adhesives to ensure a strong bond while allowing for some adjustments. Some parts needed touch-ups and reprinting, either due to slight warping, small misalignments or just realizing that a design tweak was necessary. This is where patience really pays off - each iteration gets the project closer to a professional, seamless look.

Even with careful design work in Fusion, real-world tolerances come into play. Some edges didn't align as cleanly as expected, requiring minor trimming, filling gaps with resin or putty and even reprinting the center bezel. The goal is to get everything looking as if it was meant to be there from the start - no obvious seams, no awkward gaps.

Once the parts were securely in place and the fit was dialed in, the next step was sanding. Even resin prints do have layer lines, small imperfections and support marks. I worked through different grits of sandpaper to smooth everything out. Since the final finish is going to be airbrushed, surface prep is critical. Any flaws left behind will be magnified once paint is applied, so I've been taking my time getting everything as smooth and even as possible.

The attachment A1000++ p4.8 - fitting & sanding.webp is no longer available

Now I'm ready for the next step - priming and airbrushing! Updates coming soon...

Reply 4 of 5, by ajacocks

User metadata
Rank Member
Rank
Member

Very nice work, so far!

- Alex

Reply 5 of 5, by CMB75

User metadata
Rank Member
Rank
Member

Third update: Painting & Finishing - Bringing the Amiga 1000++ case to life

With all the parts glued, assembled and smoothed out, it was finally time for one of the most satisfying steps - painting and finishing (!not!). Getting the right look for this build meant taking a careful, layered approach to ensure a smooth, professional finish. Here’s how it went:

Before applying any color, I laid down two layers of primer, allowing each coat to dry for a couple of hours before lightly sanding with 1000-grit sandpaper. This step is crucial for creating an even surface and ensuring the paint adheres properly. Any imperfections left behind at this stage would only become more noticeable later, so patience was key.

For the main color, I went with RAL 1013 (Oyster White) acrylic paint, which closely matches the original Amiga 1000 aesthetic. I applied three thin, even layers, letting each coat dry before giving it a light 2000-grit sanding to keep the surface smooth.

With the base paint done, it was time for the details - water slide decals. These added the finishing touches, like the logo and the AMIGA label, to give the system that "factory-made" look. Applying them required precision, ensuring they were perfectly aligned. Back then, when I used printable decals for my prototype 3.2 I ran into several issues with the toner not adhering to the transfer paper. Thanks to BitWrangler I got it done this time. He suggested spraying the decals with clear coat first, before applying them to the model - this worked like a charm. *Thank you, BitWrangler

To protect the paint and decals, I applied two layers of clear coat, giving the surface a smooth, even sheen. Once fully cured, I did a final 3000-grit sanding to remove any minor texture defects and bring out an almost flawless finish. A satisfactory result, reflecting my current skillset and experience with room for improvements 😉.

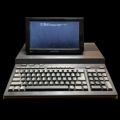
As a small reward for myself and to keep myself motivated, I assembled the parts and took a beauty shot of the case.

The attachment A1000++ p4.8 - airbrush & decals.webp is no longer available

More updates soon as this build gets closer to completion!