VOGONS


ATI Radeon 9700 PRO - help with repair

Topic actions

Reply 20 of 38, by Retronerd878

User metadata
Rank Member
Rank
Member

Did another attempt on the chip. With another fresh chip with new balls. This time the mask scratched off or something as some of the traces are slightly exposed. This is definitely not a good thing as the balls can migrate into the wrong spot. I gave it a try nonetheless. This time I measured the temps on the card and it seems that i need to set the preheater to 220 C, so the board reaches 130 C. This time I got really excited as the artifacts were gone when booting, yet we still have errors. It reverted to the initial state - ish.
Initially that chip had errors MDC0 28 30 31 and now MDC0 28 29 30 31.

However, what I find interesting is that the artifacts disappeared, just like when I first booted the card when i got it. Maybe heating up the card really good made it behave the same way. I'm thinking it's not the ram. Why do I have the feeling that it's the GPU that needs re-balling and swapping the ram chips will not solve this.

Is my assumption plausible? I'm thinking of replacing the other chip with problems and if the same bits remain, then it's clearly the gpu or something in between the gpu and ram.
Thoughts?

Reply 21 of 38, by Dothan Burger

User metadata
Rank Member
Rank
Member
tehsiggi wrote on 2026-04-14, 17:17:
Dothan Burger wrote on 2026-04-14, 11:49:

I remember having to deshim my 9700 or the GPU die wouldn't make contact with the cooler. Maybe something similar happened with this card.

The default thermal compound between cooler and GPU took that into account.

That compound had the thermal conductivity of a piece of chewing gum. The paste would be completely useless now, so what was it replaced with.

Reply 22 of 38, by tehsiggi

User metadata
Rank Oldbie
Rank
Oldbie
Dothan Burger wrote on 2026-04-18, 12:30:
tehsiggi wrote on 2026-04-14, 17:17:
Dothan Burger wrote on 2026-04-14, 11:49:

I remember having to deshim my 9700 or the GPU die wouldn't make contact with the cooler. Maybe something similar happened with this card.

The default thermal compound between cooler and GPU took that into account.

That compound had the thermal conductivity of a piece of chewing gum. The paste would be completely useless now, so what was it replaced with.

That compound was initially (when shipped) not too bad. Unless you removed the cooler back then, there was no need to repaste it. I emphasize on "back then". Most 9700s I had did not have an issue with the shim.

Retronerd878 wrote on 2026-04-18, 10:25:
Did another attempt on the chip. With another fresh chip with new balls. This time the mask scratched off or something as some o […]
Show full quote

Did another attempt on the chip. With another fresh chip with new balls. This time the mask scratched off or something as some of the traces are slightly exposed. This is definitely not a good thing as the balls can migrate into the wrong spot. I gave it a try nonetheless. This time I measured the temps on the card and it seems that i need to set the preheater to 220 C, so the board reaches 130 C. This time I got really excited as the artifacts were gone when booting, yet we still have errors. It reverted to the initial state - ish.
Initially that chip had errors MDC0 28 30 31 and now MDC0 28 29 30 31.

However, what I find interesting is that the artifacts disappeared, just like when I first booted the card when i got it. Maybe heating up the card really good made it behave the same way. I'm thinking it's not the ram. Why do I have the feeling that it's the GPU that needs re-balling and swapping the ram chips will not solve this.

Is my assumption plausible? I'm thinking of replacing the other chip with problems and if the same bits remain, then it's clearly the gpu or something in between the gpu and ram.
Thoughts?

Hmm.. no real change at all is too much of a coincidence.

The attachment mdc.PNG is no longer available

The affected pins are at the edge of the GPU.
However if the connectivity between GPU and Memory would be bad, I'd somewhat expect MDC1 to appear with errors on the same bits. Strike that, my brain was still on 9600XT and FireGL mode. It's only single rank for the 9700 and 9800 128MB.

Last edited by tehsiggi on 2026-04-19, 08:00. Edited 1 time in total.

AGP Card Real Power Consumption
AGP Power monitor - diagnostic hardware tool
Graphics card repair collection

Reply 23 of 38, by Retronerd878

User metadata
Rank Member
Rank
Member

I'm doing the other ram chip see if we have any progress. Will report later

Reply 24 of 38, by Retronerd878

User metadata
Rank Member
Rank
Member

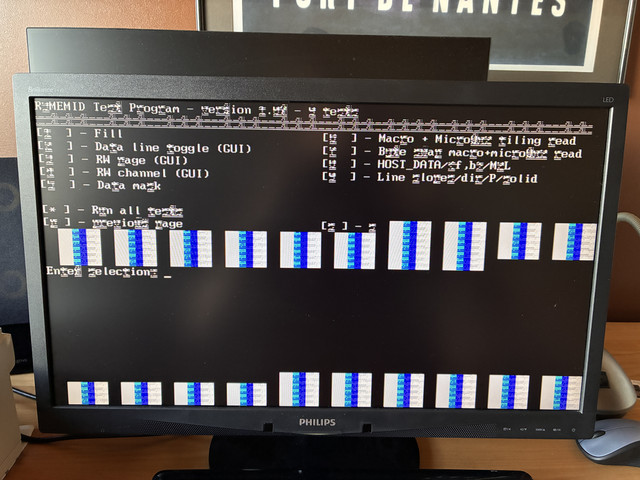
R3MEMID version 1.07, (c) Copyright ATI Technologies Inc, 2003
Log file generation enabled to .\R3MEMID.LOG ...
Reference data file (RDF) loading disabled ...
No wait on error enabled (not effected by '-s') ...
TEST RESULT SUMMARY:
====================
R300 (0x4e44) detected.
128M video memory.
Test suite ran 1 of 1 times.
Checking test status array ...
[1 ] Fill : FAIL
Error ID 0VB001
1024 x 768 - 32 bpp ( 60 Hz): TEST FAILURE
failing bit : MDC0 28 29 30 31

[2 ] Data line toggle (GUI) : FAIL
Error ID 0VB023
1024 x 768 - 32 bpp ( 60 Hz): TEST FAILURE
failing bit : MDC0 28 29 30 31

[3 ] RW page (GUI) : FAIL
Error ID 0VB025
1024 x 768 - 32 bpp ( 60 Hz): TEST FAILURE
failing bit : MDC0 28 29 30 31

[4 ] RW channel (GUI) : FAIL
Error ID 0VB028
1024 x 768 - 32 bpp ( 60 Hz): TEST FAILURE
failing bit : MDC0 28 29 30 31

[5 ] Data mask : FAIL
Error ID 0VB006
1024 x 768 - 32 bpp ( 60 Hz): TEST FAILURE
failing bit : MDC0 28 29 30 31

[6 ] Macro + Micro8x2 tiling read : PASS
[7 ] Byte swap macro+micro8x2 read : FAIL
Error ID 0VC018
1024 x 768 - 32 bpp ( 60 Hz): TEST FAILURE
failing bit : MDC0 28 29 30 31

[8 ] HOST_DATA/<f,b>/M2L : FAIL
Error ID 0TR014
640 x 480 - 8 bpp ( 75 Hz): TEST FAILURE
failing bit : MDC0 29 MDD0 32 33 34 35 36 37 38 39 ...

640 x 480 - 15 bpp ( 75 Hz): TEST FAILURE
failing bit : MDC0 29 MDD0 32 33 34 35 36 37 38 39 ...

640 x 480 - 16 bpp ( 75 Hz): TEST FAILURE
failing bit : MDC0 29 MDD0 32 33 34 35 36 37 38 39 ...

640 x 480 - 32 bpp ( 75 Hz): TEST PASSED
800 x 600 - 8 bpp ( 75 Hz): TEST FAILURE
failing bit : MDC0 29 MDD0 32 33 34 35 36 37 38 39 ...

800 x 600 - 15 bpp ( 75 Hz): TEST FAILURE
failing bit : MDC0 29 MDD0 32 33 34 35 36 37 38 39 ...

800 x 600 - 16 bpp ( 75 Hz): TEST FAILURE
failing bit : MDC0 29 MDD0 32 33 34 35 36 37 38 39 ...

800 x 600 - 32 bpp ( 75 Hz): TEST PASSED
1024 x 768 - 8 bpp ( 75 Hz): TEST FAILURE
failing bit : MDC0 29 MDD0 32 33 34 35 36 37 38 39 ...

1024 x 768 - 15 bpp ( 75 Hz): TEST FAILURE
failing bit : MDC0 29 MDD0 32 33 34 35 36 37 38 39 ...

1024 x 768 - 16 bpp ( 75 Hz): TEST FAILURE
failing bit : MDC0 29 MDD0 32 33 34 35 36 37 38 39 ...

1024 x 768 - 32 bpp ( 75 Hz): TEST PASSED
[9 ] Line slopes/dir/P/solid : FAIL
Error ID 0TR010
640 x 480 - 8 bpp ( 75 Hz): TEST FAILURE
failing bit : MDC0 29 MDD0 32 33 34 35 36 37 38 39 ...

640 x 480 - 15 bpp ( 75 Hz): TEST FAILURE
failing bit : MDC0 29 MDD0 32 33 34 35 36 37 38 39 ...

640 x 480 - 16 bpp ( 75 Hz): TEST FAILURE
failing bit : MDC0 29 MDD0 32 33 34 35 36 37 38 39 ...

640 x 480 - 32 bpp ( 75 Hz): TEST PASSED
800 x 600 - 8 bpp ( 75 Hz): TEST FAILURE
failing bit : MDC0 29 MDD0 32 33 34 35 36 37 38 39 ...

800 x 600 - 15 bpp ( 75 Hz): TEST FAILURE
failing bit : MDC0 29 MDD0 32 33 34 35 36 37 38 39 ...

800 x 600 - 16 bpp ( 75 Hz): TEST FAILURE
failing bit : MDC0 29 MDD0 32 33 34 35 36 37 38 39 ...

800 x 600 - 32 bpp ( 75 Hz): TEST PASSED
1024 x 768 - 8 bpp ( 75 Hz): TEST FAILURE
failing bit : MDC0 29 MDD0 32 33 34 35 36 37 38 39 ...

1024 x 768 - 15 bpp ( 75 Hz): TEST FAILURE
failing bit : MDC0 29 MDD0 32 33 34 35 36 37 38 39 ...

1024 x 768 - 16 bpp ( 75 Hz): TEST FAILURE
failing bit : MDC0 29 MDD0 32 33 34 35 36 37 38 39 ...

1024 x 768 - 32 bpp ( 75 Hz): TEST PASSED
Failure detected.

Tried hot airing without the kapton tape and I think I saw the chip settle this time without the kapton tape in the way (if my eyes haven't glitched). One nearby resistor did flew off, but I soldered it back.
There is definitely an improvement now. No artifacts at all in the dos prompt. However, there are still errors.
Now I don't understand if my bga chip solder is bad, or it's something else.

Reply 25 of 38, by pete8475

User metadata
Rank Oldbie
Rank
Oldbie
tehsiggi wrote on 2026-04-14, 17:17:
Dothan Burger wrote on 2026-04-14, 11:49:

I remember having to deshim my 9700 or the GPU die wouldn't make contact with the cooler. Maybe something similar happened with this card.

The default thermal compound between cooler and GPU took that into account.

Absolutely not.

All those cards with the shim that was too large would cook themselves.

aka pete4237.5

Reply 26 of 38, by tehsiggi

User metadata
Rank Oldbie
Rank
Oldbie
pete8475 wrote on 2026-04-18, 15:51:
tehsiggi wrote on 2026-04-14, 17:17:
Dothan Burger wrote on 2026-04-14, 11:49:

I remember having to deshim my 9700 or the GPU die wouldn't make contact with the cooler. Maybe something similar happened with this card.

The default thermal compound between cooler and GPU took that into account.

Absolutely not.

All those cards with the shim that was too large would cook themselves.

All cards i dissected with original coolers had proper contact due to the thermal pad used. Even the articles from the time back then support that. The pad filled the gap, though not ideal from a thermal conductivity standpoint compared to a good thermal paste.

AGP Card Real Power Consumption
AGP Power monitor - diagnostic hardware tool
Graphics card repair collection

Reply 27 of 38, by pete8475

User metadata
Rank Oldbie
Rank
Oldbie
tehsiggi wrote on 2026-04-18, 18:00:
pete8475 wrote on 2026-04-18, 15:51:
tehsiggi wrote on 2026-04-14, 17:17:

The default thermal compound between cooler and GPU took that into account.

Absolutely not.

All those cards with the shim that was too large would cook themselves.

All cards i dissected with original coolers had proper contact due to the thermal pad used. Even the articles from the time back then support that. The pad filled the gap, though not ideal from a thermal conductivity standpoint compared to a good thermal paste.

This is an issue I experienced first hand when these cards came on the market. Fresh out of the box the first 9700 Pro I purchased for a customer got too hot under load and locked up consistently when doing anything in 3D, removed the shim, reinstalled the factory cooler and the problem was gone, no more crashing. From that point on I removed the shim on every single one before I let those computers go out.

aka pete4237.5

Reply 28 of 38, by Minutemanqvs

User metadata
Rank Member
Rank
Member

Hi, I have the same card as yours, with similar artefacts. I took Necroware's NWVMT source code and modified it to better support Radeon chips as by default it tends to only detect/test 16MB on them and headless logging was absent.

So here is the log output on a perfectly viable 9600XT:

Necroware's Video Memory Tester
Version 0.0.2 (build date 2026-02-08)

Test Info:
----------
OEM String: ATI RADEON 9600 PRO
Vendor: ATI Technologies Inc.
Product: V350
Revision: 01.00
Total Memory: 256MB (manual override)
Memory bus: 128-bit
Number of chips: 8
Test video mode: 0X111 [640x480x16]

Result:
----------
Chip 0: OK
Chip 1: OK
Chip 2: OK
Chip 3: OK
Chip 4: OK
Chip 5: OK
Chip 6: OK
Chip 7: OK

And here is the result on the 9700 Pro:

Necroware's Video Memory Tester
Version 0.0.2 (build date 2026-02-08)

Test Info:
----------
OEM String: ATI R300
Vendor: ATI Technologies Inc.
Product: R300
Revision: 01.00
Total Memory: 128MB (manual override)
Memory bus: 256-bit
Number of chips: 8
Test video mode: 0X111 [640x480x16]

Result:
----------
Chip 0: BAD
Chip 1: OK
Chip 2: BAD
Chip 3: OK
Chip 4: BAD
Chip 5: OK
Chip 6: BAD
Chip 7: OK

So I doubt every 1 of 2 memory chip has an issue, reflowing seems to be my only hope. And graphically, well...
ECFDC8-D0-AE04-4016-8145-D6-A8-CD7-AC9-F9-1-102-o.jpg

If someone is interested in the modified nwvmt "0.2" (memory size detection override and logging to file), it is attached. (the code is also proposed on GitHub but no reply since 2 months).
You can then simply launch it via autoexec.bat with for example "c:\nwvmt\nwvmt.exe --chips=8 --bus=256 --size=128 --log" it you can't really read your screen, you only have to press "enter" at the beginning to start the test. Tests take much longer than before because it tests all the memory and not only 16MB on the Radeons, so it's normal to have a 30 second black screen at the beginning of the first test.

Searching anything Nexgen, PM me if you have one. Also ATI Rage 128 PCI cards.

Reply 29 of 38, by tehsiggi

User metadata
Rank Oldbie
Rank
Oldbie
Minutemanqvs wrote on 2026-04-19, 06:44:
Hi, I have the same card as yours, with similar artefacts. I took Necroware's NWVMT source code and modified it to better suppor […]
Show full quote

Hi, I have the same card as yours, with similar artefacts. I took Necroware's NWVMT source code and modified it to better support Radeon chips as by default it tends to only detect/test 16MB on them and headless logging was absent.

So here is the log output on a perfectly viable 9600XT:

Necroware's Video Memory Tester
Version 0.0.2 (build date 2026-02-08)

Test Info:
----------
OEM String: ATI RADEON 9600 PRO
Vendor: ATI Technologies Inc.
Product: V350
Revision: 01.00
Total Memory: 256MB (manual override)
Memory bus: 128-bit
Number of chips: 8
Test video mode: 0X111 [640x480x16]

Result:
----------
Chip 0: OK
Chip 1: OK
Chip 2: OK
Chip 3: OK
Chip 4: OK
Chip 5: OK
Chip 6: OK
Chip 7: OK

And here is the result on the 9700 Pro:

Necroware's Video Memory Tester
Version 0.0.2 (build date 2026-02-08)

Test Info:
----------
OEM String: ATI R300
Vendor: ATI Technologies Inc.
Product: R300
Revision: 01.00
Total Memory: 128MB (manual override)
Memory bus: 256-bit
Number of chips: 8
Test video mode: 0X111 [640x480x16]

Result:
----------
Chip 0: BAD
Chip 1: OK
Chip 2: BAD
Chip 3: OK
Chip 4: BAD
Chip 5: OK
Chip 6: BAD
Chip 7: OK

So I doubt every 1 of 2 memory chip has an issue, reflowing seems to be my only hope. And graphically, well...
ECFDC8-D0-AE04-4016-8145-D6-A8-CD7-AC9-F9-1-102-o.jpg

If someone is interested in the modified nwvmt "0.2" (memory size detection override and logging to file), it is attached. (the code is also proposed on GitHub but no reply since 2 months).
You can then simply launch it via autoexec.bat with for example "c:\nwvmt\nwvmt.exe --chips=8 --bus=256 --size=128 --log" it you can't really read your screen, you only have to press "enter" at the beginning to start the test. Tests take much longer than before because it tests all the memory and not only 16MB on the Radeons, so it's normal to have a 30 second black screen at the beginning of the first test.

Why don't you just run R3MEMID? It'll tell you exactly which chips are affected. Then you can compare it and - if applicable - fix the implementation in nwmt to behave similar.
As much as I like the idea of a universal tool for memory testing, if you want to seriously debug your card, give R3MEMID a shot and check its results.

Having half of the chips not working would somehow mean that half of each memory channel is dead, which is weird. (the R300 has 4 64bit channels) or 2 channels completely dead.

AGP Card Real Power Consumption
AGP Power monitor - diagnostic hardware tool
Graphics card repair collection

Reply 30 of 38, by Retronerd878

User metadata
Rank Member
Rank
Member

I'm kind of thinking that my bga soldering job is not quite there and I'm trying to figure out what am I doing wrong or what steps I'm skipping.
The first chip replacement added another bit with errors and the other chip fixed some bits but others remained. So, right now I'm thinking that my BGA skills need improving.

Questions:
1) @tehsiggi what kind of flux do you use? I'm using MG chemicals 8341. Maybe it's not great for BGA.
2) The replacement chips are from AliExpress with balls pre-applied. Maybe I should re-ball the chips anyway with fresh solder?
3) I saw a technique when soldering the chips to the board. At the end of the process, when the chips settles in place you quickly add flux to all edges of the chip and do another 5-7 seconds with hot air for 2nd reflow. Is this how you do it as well?

Reply 31 of 38, by zuldan

User metadata
Rank Oldbie
Rank
Oldbie
Retronerd878 wrote on 2026-04-19, 08:25:
I'm kind of thinking that my bga soldering job is not quite there and I'm trying to figure out what am I doing wrong or what ste […]
Show full quote

I'm kind of thinking that my bga soldering job is not quite there and I'm trying to figure out what am I doing wrong or what steps I'm skipping.
The first chip replacement added another bit with errors and the other chip fixed some bits but others remained. So, right now I'm thinking that my BGA skills need improving.

Questions:
1) @tehsiggi what kind of flux do you use? I'm using MG chemicals 8341. Maybe it's not great for BGA.
2) The replacement chips are from AliExpress with balls pre-applied. Maybe I should re-ball the chips anyway with fresh solder?
3) I saw a technique when soldering the chips to the board. At the end of the process, when the chips settles in place you quickly add flux to all edges of the chip and do another 5-7 seconds with hot air for 2nd reflow. Is this how you do it as well?

This is my process for the gear I have. tehsiggi‘s will probably be different with his gear.

To remove IC (memory chip or core)
—————————————————————-

1. Preheat PCB to 150c (top of PCB, use a thermocouple taped to the top of the PCB. This is very important). My preheater is usually at 270c to achieve 150c on top of the PCB.

2. Apply flux around IC

3. Apply heat gun to IC (I set mine to 300c, air flow 80). The top PCB (note, thermocouple is right next to IC) then rises to 240c to 280c. After 20 seconds or so I gently push the IC on the side to see if it moves and snaps back into place. Once it moves I remove the IC.

Note: On leaded solder PCBs you won’t need as much heat. For large cores you’ll need to increase the heat and air flow to accommodate for a larger square funnel at the end of the heat gun.

To install a IC (memory chip or core)
——————————————————————

I use the same 3 steps above but I apply a very thin layer of flux on the pads on the PCB and balls on the IC. Too much flux can cause the IC to float around too much.

Equipment
———————

- Flux NC-559-ASM https://www.aliexpress.com/item/1005004863129918.html
- Preheater PUHUI T8280 https://www.aliexpress.com/item/1005010520024198.html
- Heat gun Quick 861DW (1000W)
- Thermocouple TM-902C https://www.aliexpress.com/item/1005005976654415.html

If you are reballing, the only flux I found to work perfectly is Stirri VS-UHF-TF https://stirri.com/products/stirri-vs-uhf-tf- … l0-amber-series (it’s also recommended by northwestrepairs for reballs). I haven’t had any issues with ICs that come preballed.

Last edited by zuldan on 2026-04-19, 09:38. Edited 6 times in total.

Reply 32 of 38, by shevalier

User metadata
Rank Oldbie
Rank
Oldbie
Retronerd878 wrote on 2026-04-19, 08:25:

I'm using MG chemicals 8341. Maybe it's not great for BGA.

Apply it to the unwanted board and heat it in the same way as when soldering.
If it boils (active bubbling), it will definitely displace the solder balls.
If you have a balls, try reflow them on a test board using this flux.
A 5x5 balls area will be more than enough to see the results.

Last edited by shevalier on 2026-04-19, 12:31. Edited 1 time in total.

Aopen MX3S, PIII-S Tualatin 1133, Radeon 9800Pro@XT BIOS, Audigy 4 SB0610
JetWay K8T8AS, Athlon DH-E6 3000+, Radeon HD2600Pro AGP, Audigy 2 Value SB0400
Gigabyte Ga-k8n51gmf, Turion64 ML-30@2.2GHz , Radeon X800GTO PL16, Diamond monster sound MX300

Reply 33 of 38, by tehsiggi

User metadata
Rank Oldbie
Rank
Oldbie
Retronerd878 wrote on 2026-04-19, 08:25:
I'm kind of thinking that my bga soldering job is not quite there and I'm trying to figure out what am I doing wrong or what ste […]
Show full quote

I'm kind of thinking that my bga soldering job is not quite there and I'm trying to figure out what am I doing wrong or what steps I'm skipping.
The first chip replacement added another bit with errors and the other chip fixed some bits but others remained. So, right now I'm thinking that my BGA skills need improving.

Questions:
1) @tehsiggi what kind of flux do you use? I'm using MG chemicals 8341. Maybe it's not great for BGA.
2) The replacement chips are from AliExpress with balls pre-applied. Maybe I should re-ball the chips anyway with fresh solder?
3) I saw a technique when soldering the chips to the board. At the end of the process, when the chips settles in place you quickly add flux to all edges of the chip and do another 5-7 seconds with hot air for 2nd reflow. Is this how you do it as well?

For Flux I use either Amtech NC-559 (I have that laying around) or some cheap one from ali, I can't recall which one, I'd have to check in the lab.
For memory I do not reball the chips, they worked fine every time for me.
I do not add any additional flux in my case, after the chip is positioned. However if you want to try, you can give it a shot with additional flux + second reflow.

The issue with all of that is, there's no "definitive" answer, as zuldan said. It basically heavily depends on your equipment. There is a lot of trial and error that goes into this (same for me as for everyone else I suspect) until one may claim to be good with it.

Btw. whenever I talked about rank0 and rank1, discard that. My brain was in full RV350 mode - it's all rank0, meaning whenever there are bits affected, you'll only affect one chip at a time.

AGP Card Real Power Consumption
AGP Power monitor - diagnostic hardware tool
Graphics card repair collection

Reply 34 of 38, by Minutemanqvs

User metadata
Rank Member
Rank
Member
tehsiggi wrote on 2026-04-19, 07:10:
Why don't you just run R3MEMID? It'll tell you exactly which chips are affected. Then you can compare it and - if applicable - f […]
Show full quote
Minutemanqvs wrote on 2026-04-19, 06:44:
Hi, I have the same card as yours, with similar artefacts. I took Necroware's NWVMT source code and modified it to better suppor […]
Show full quote

Hi, I have the same card as yours, with similar artefacts. I took Necroware's NWVMT source code and modified it to better support Radeon chips as by default it tends to only detect/test 16MB on them and headless logging was absent.

So here is the log output on a perfectly viable 9600XT:

Necroware's Video Memory Tester
Version 0.0.2 (build date 2026-02-08)

Test Info:
----------
OEM String: ATI RADEON 9600 PRO
Vendor: ATI Technologies Inc.
Product: V350
Revision: 01.00
Total Memory: 256MB (manual override)
Memory bus: 128-bit
Number of chips: 8
Test video mode: 0X111 [640x480x16]

Result:
----------
Chip 0: OK
Chip 1: OK
Chip 2: OK
Chip 3: OK
Chip 4: OK
Chip 5: OK
Chip 6: OK
Chip 7: OK

And here is the result on the 9700 Pro:

Necroware's Video Memory Tester
Version 0.0.2 (build date 2026-02-08)

Test Info:
----------
OEM String: ATI R300
Vendor: ATI Technologies Inc.
Product: R300
Revision: 01.00
Total Memory: 128MB (manual override)
Memory bus: 256-bit
Number of chips: 8
Test video mode: 0X111 [640x480x16]

Result:
----------
Chip 0: BAD
Chip 1: OK
Chip 2: BAD
Chip 3: OK
Chip 4: BAD
Chip 5: OK
Chip 6: BAD
Chip 7: OK

So I doubt every 1 of 2 memory chip has an issue, reflowing seems to be my only hope. And graphically, well...
ECFDC8-D0-AE04-4016-8145-D6-A8-CD7-AC9-F9-1-102-o.jpg

If someone is interested in the modified nwvmt "0.2" (memory size detection override and logging to file), it is attached. (the code is also proposed on GitHub but no reply since 2 months).
You can then simply launch it via autoexec.bat with for example "c:\nwvmt\nwvmt.exe --chips=8 --bus=256 --size=128 --log" it you can't really read your screen, you only have to press "enter" at the beginning to start the test. Tests take much longer than before because it tests all the memory and not only 16MB on the Radeons, so it's normal to have a 30 second black screen at the beginning of the first test.

Why don't you just run R3MEMID? It'll tell you exactly which chips are affected. Then you can compare it and - if applicable - fix the implementation in nwmt to behave similar.
As much as I like the idea of a universal tool for memory testing, if you want to seriously debug your card, give R3MEMID a shot and check its results.

Having half of the chips not working would somehow mean that half of each memory channel is dead, which is weird. (the R300 has 4 64bit channels) or 2 channels completely dead.

I just never used it. I tried it right now with"R3MEMID.EXE -LOG -GENREF -NOCFG" and selecting test "1" and I see there is an error (but can't read the text). And nothing seems to be logged in the file.
What's the usual procedure to follow?

IMG-3873.jpg
IMG-3876.jpg

Searching anything Nexgen, PM me if you have one. Also ATI Rage 128 PCI cards.

Reply 35 of 38, by Retronerd878

User metadata
Rank Member
Rank
Member

You should select * in the menu to take all the tests. To make the selection in the command line use: R3MEMID -NOCFG -LOG -NW *

Reply 36 of 38, by tehsiggi

User metadata
Rank Oldbie
Rank
Oldbie

My procedure is usually: move/remove the R3MEMID.LOG file with old results in the execution directory. Run R3MEMID.EXE and select all tests using *, as mentioned by Retronerd878. The results should be able to be read afterwards from the R3MEMID.LOG.

If you want to exit, I think it prompts you to press 1 or 0 - I can check later again.

What I can see from your screenshot already is MDD being affected, which is only one of four memory channels, thus only affecting 2 memory chips at maximum. Not 4.

AGP Card Real Power Consumption
AGP Power monitor - diagnostic hardware tool
Graphics card repair collection

Reply 37 of 38, by Minutemanqvs

User metadata
Rank Member
Rank
Member

Ah thanks for your help! It logs now 😀

R3MEMID version 1.07, (c) Copyright ATI Technologies Inc, 2003 Log file generation enabled to .\R3MEMID.LOG ... Reference data f […]
Show full quote

R3MEMID version 1.07, (c) Copyright ATI Technologies Inc, 2003
Log file generation enabled to .\R3MEMID.LOG ...
Reference data file (RDF) loading disabled ...
No wait on error enabled (not effected by '-s') ...
TEST RESULT SUMMARY:
====================
R300 (0x4e44) detected.
128M video memory.
Test suite ran 1 of 1 times.
Checking test status array ...
[1 ] Fill : FAIL
Error ID 0VB001
1024 x 768 - 32 bpp ( 60 Hz): TEST FAILURE
failing bit : MDD0 0 1 2 3 4 5 6 7 ...

[2 ] Data line toggle (GUI) : FAIL
Error ID 0VB023
1024 x 768 - 32 bpp ( 60 Hz): TEST FAILURE
failing bit : MDD0 0 1 2 3 4 5 6 7 ...

[3 ] RW page (GUI) : FAIL
Error ID 0VB025
1024 x 768 - 32 bpp ( 60 Hz): TEST FAILURE
failing bit : MDD0 0 1 2 3 4 5 6 7 ...

[4 ] RW channel (GUI) : FAIL
Error ID 0VB028
1024 x 768 - 32 bpp ( 60 Hz): TEST FAILURE
failing bit : MDD0 0 1 2 3 4 5 6 7 ...

[5 ] Data mask : FAIL
Error ID 0VB006
1024 x 768 - 32 bpp ( 60 Hz): TEST FAILURE
failing bit : MDD0 0 1 2 3 4 5 6 7 ...

[6 ] Macro + Micro8x2 tiling read : FAIL
Error ID 0VC006
1024 x 768 - 32 bpp ( 60 Hz): TEST FAILURE
failing bit : MDD0 0 1 2 3 4 5 6 7 ...

[7 ] Byte swap macro+micro8x2 read : FAIL
Error ID 0VC018
1024 x 768 - 32 bpp ( 60 Hz): TEST FAILURE
failing bit : MDD0 0 1 2 3 4 5 6 7 ...

[8 ] HOST_DATA/<f,b>/M2L : FAIL
Error ID 0TR014
640 x 480 - 8 bpp ( 75 Hz): TEST FAILURE
error : R051A.8 not found
640 x 480 - 15 bpp ( 75 Hz): TEST FAILURE
error : R052A.8 not found
640 x 480 - 16 bpp ( 75 Hz): TEST FAILURE
error : R053A.8 not found
640 x 480 - 32 bpp ( 75 Hz): TEST FAILURE
error : R055A.8 not found
800 x 600 - 8 bpp ( 75 Hz): TEST FAILURE
error : R061A.8 not found
800 x 600 - 15 bpp ( 75 Hz): TEST FAILURE
error : R062A.8 not found
800 x 600 - 16 bpp ( 75 Hz): TEST FAILURE
error : R063A.8 not found
800 x 600 - 32 bpp ( 75 Hz): TEST FAILURE
error : R065A.8 not found
1024 x 768 - 8 bpp ( 75 Hz): TEST FAILURE
error : R071A.8 not found
1024 x 768 - 15 bpp ( 75 Hz): TEST FAILURE
error : R072A.8 not found
1024 x 768 - 16 bpp ( 75 Hz): TEST FAILURE
error : R073A.8 not found
1024 x 768 - 32 bpp ( 75 Hz): TEST FAILURE
error : R075A.8 not found
[9 ] Line slopes/dir/P/solid : FAIL
Error ID 0TR010
640 x 480 - 8 bpp ( 75 Hz): TEST FAILURE
error : R051A.9 not found
640 x 480 - 15 bpp ( 75 Hz): TEST FAILURE
error : R052A.9 not found
640 x 480 - 16 bpp ( 75 Hz): TEST FAILURE
error : R053A.9 not found
640 x 480 - 32 bpp ( 75 Hz): TEST FAILURE
error : R055A.9 not found
800 x 600 - 8 bpp ( 75 Hz): TEST FAILURE
error : R061A.9 not found
800 x 600 - 15 bpp ( 75 Hz): TEST FAILURE
error : R062A.9 not found
800 x 600 - 16 bpp ( 75 Hz): TEST FAILURE
error : R063A.9 not found
800 x 600 - 32 bpp ( 75 Hz): TEST FAILURE
error : R065A.9 not found
1024 x 768 - 8 bpp ( 75 Hz): TEST FAILURE
error : R071A.9 not foun right?
1024 x 768 - 15 bpp ( 75 Hz): TEST FAILURE
error : R072A.9 not found
1024 x 768 - 16 bpp ( 75 Hz): TEST FAILURE
error : R073A.9 not found
1024 x 768 - 32 bpp ( 75 Hz): TEST FAILURE
error : R075A.9 not found
Failure detected.

So from what I can gather, on the same card as posted in this thread, I probably have a bad solder joint on the top-right memory chip if I have the AGP slot facing towards me. MDD0 = Memory channel D, Rank 0.

Searching anything Nexgen, PM me if you have one. Also ATI Rage 128 PCI cards.

Reply 38 of 38, by momaka

User metadata
Rank Oldbie
Rank
Oldbie
Retronerd878 wrote on 2026-04-18, 10:25:

However, what I find interesting is that the artifacts disappeared, just like when I first booted the card when i got it. Maybe heating up the card really good made it behave the same way. I'm thinking it's not the ram. Why do I have the feeling that it's the GPU that needs re-balling and swapping the ram chips will not solve this.

Is my assumption plausible? I'm thinking of replacing the other chip with problems and if the same bits remain, then it's clearly the gpu or something in between the gpu and ram.
Thoughts?

Back in the day when PCI express was a few years old and all kinds of Radeon 9700/9800 cards were sold on Ebay by the bucketload, I got one lot of 8 cards: Radeon 9700's non-Pro and mostly Dell OEMs, judging by the D P/N's beginning with "0", which is a "Dell thing". From these, all but two were likely discarded due to having artifacts. So from these 6, I got 3 of them working back again simply by doing a very crude "reflow". I say crude, because I only had a heatgun back then and no idea if I actually reached proper reflowing temperatures. (Well, the story is a bit longer than that and I did eventually try to reflow one of these cards on a proper reflow machine with someone who knew how to do proper BGA work... and the card still didn't get revived with that, but did get revived after another crude reflow/reheat attempt with my head gun.)
So in fewer words, I had success in bringing back 3 out of 6 artifacted cards by simply reheating them.
Two of these are still working 10 years later... though I will admit I didn't put them through too much use over the years and I did install much bigger coolers on them + made sure the entire card is always cooled well. The one (from the 3) that failed again was before I started using the oversized coolers (I put a 3rd party cooler on it that was the same size as a Radeon 9800.) Needless to say, this card failing is what prompted me to put the much bigger coolers on the other two... and perhaps why they are still OK so far.

My hunch is the GPU chip goes bad on these more frequently than anything (mainly due to the undersized cooler)... though there certainly seem to be multiple ways these cards can fail.
With that said, I do think that a simple reheat (but not necessarily hot enough for solder to "reflow") can often be used without harm as a test to see if the card comes back alive. If it does, then -probably- the GPU chip had issues.