VOGONS


Reply 20 of 40, by geordiepingu

User metadata
Rank Newbie
Rank
Newbie

Decided to buy some more stuff this morning, after buying another project car.... A fun day for me!

XSPC 240mm x 50mm rad.... £20 new from WCUK (yes, £20!!!)
16/10 fittings, 45s etc. Mostly Barrow, as I refuse to spend more watercooling on this than my main PC!
Alphacool Eisfach dual 5.25" bay reservoir with a D5 Vario pump
Hose
Inhibitor and deionised water
Chipset block

Basically, everything I need for a good day of plumbing

On top of that, I bought all the connectors and wire to make EVERY power connector for the PSU, in the right "old school ATX" colour. Unfortunately, I damaged the ATX12v cable taking it out - think it's had a bit too much abuse over the years, so figured now is the opportunity to make it look as period correct as possible, as well as beef up the power delivery to the board. It's also something new for me. I've made plenty of car ECU looms before with my crimps, but I've never tried making my own modular PSU loom. Plenty of spare cable and pins to make mistakes with... I am just trying not to think about how tedious it is going to be, crimping probably 150+ pins...

So you may ask, am I beefing up the power delivery? Well, I can safely say the old P4 connector measures at 2mm OD, which I would estimate as 18AWG. I am going to swap it for 16AWG, my logic being that it's a 4-pin connector powering 2x Bartons overclocked, it needs as much power as it can get without getting hot (and voltage droop over resistance).

The ATX12v connector has some sense wires the PSU uses for its voltage regulation feedback loop circuitry, so I've accounted for that.

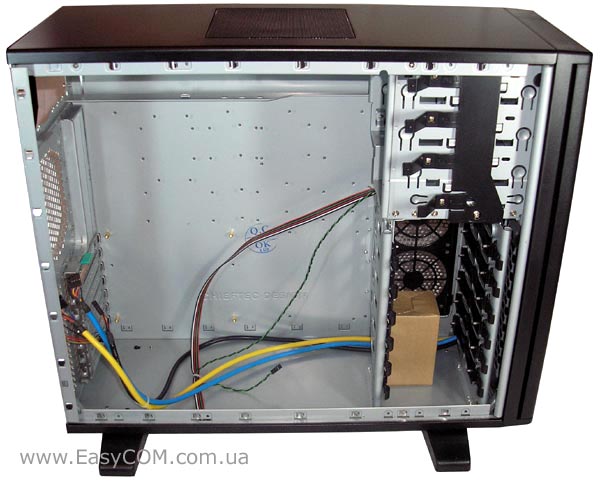
I've also started thinking about how I'm going to mount this XSPC rad. I am going to go with the option of mounting it above the PSU, eventually venting out of the side panel (when I figure out how or who I'm going to use to cut it). Very simply, I am going to get some 1.2mm steel laser cut, then drill and tap some M3 screw holes to mount it in situ. It will mean DVD drives won't be mounted at the top, which is fine, as I need to show off my bay reservoir. Picture with some scrap steel to show the concept. It will screw to the PSU bracket and the inside of the drive cage very easily. It does give me an option for draining the system, as I am still unsure whether to cool the GPU, which would make it easy for me to T off and have a ball valve. Albeit more cumbersome, I can dismount the radiator and drain it from the back side.

Clever money tells me that I will "just fit" the radiator horizontally and have ample space vertically. (I've measured 6 times). Here's a concept with a bit of scrap steel:

file.php?mode=view&id=244938

While I was ordering connectors from CPC, I saw the main power cap on the X-Fi was looking a little bit sad. I've ordered a Panasonic FR series for it. In the same thought of "pushing things to their limit", I did also get some caps for the 7800GS, although they are Unicon and probably fine, so I will leave them until they are not fine. One of the decouplers looks a bit sad, so that is getting swapped (Rubycon for Rubycon).

shevalier wrote on 2026-06-30, 04:23:

Chifteс now makes different shapes of cutouts.
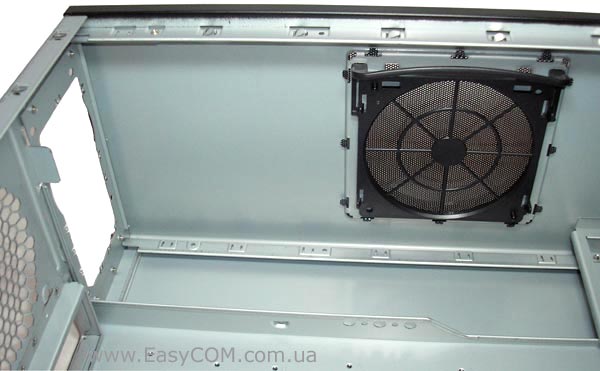
Sawing two small holes instead of one large one seems a bit odd, especially considering the steel is about 1 mm thick.

Always work on the principle that it's easier to remove metal than add metal. I made the cuts with my angle grinder out of impatience, which (as we always know) will end up too big and wrong. As such, I kept cutting and filing by eye until I got rid of my cut marks, which ironically gave me one mid-size hole. What I should've done in hindsight is employ some patience and get my plasma cutter out of my workshop and dig out my straight edges. Alas, got a hole and it's functional, and hasn't removed too much rigidity from the case. I have sprayed some clear lacquer on for now to prevent any flash rusting since I live by the coast, with a view that I will paint the entire thing at some point in the future. I will get some PVC trim to make it look a bit less horrid. The concept works well, though, with plenty of access to solder some wire in from the back while it's screwed together.
file.php?mode=view&id=244939

Reply 21 of 40, by geordiepingu

User metadata
Rank Newbie
Rank
Newbie

My rad arrived today, which meant I could do some further mocking up and triple-check my measurements. Just as well, I needed to shift the rad over another 5mm, due to the bungs at the end. The bottom of the rad sits with about 2mm of clearance from the top of the PSU.

I did get some cursory quotes to get the template laser-cut. However, looking at the cost, I think I'll be getting my jigsaw and metal blade out... I have some contact adhesive and have remembered how to export my CAD designs onto paper 1:1, so guess what I am going to be doing.

This is what the radiator mounting panel looks like at the moment. I haven't done holes for tapping on the design intentionally; I intend to clamp it in place, then drill and tap it in situ, so I don't have the difficulty of making holes line up.
file.php?mode=view&id=244968

I have also been thinking about the side panel in the same context. At first, I modelled a full-size window with a 30mm offset. I'm now contemplating whether to do a 20mm offset to allow a little bit more airflow from the rad out of the side of the case. Either way, it will be a bit of an arduous process lining up 8x sheets of paper and trimming the overlaps to fit, but nothing I haven't done before. Unless I can find someone nearby with an A3 printer to make it a few less sheets....

Not going to drill screw holes for the window. Sikaflex can hold a windscreen to steel so it should be alright at holding something like this together, for a cleaner look and easier assembly.

Here's the 30mm offset variant with 30mm radials.
file.php?mode=view&id=244969

Repaired my X-Fi too, happy bunny.

Reply 22 of 40, by TELVM

User metadata
Rank Oldbie
Rank
Oldbie
geordiepingu wrote on 2026-06-29, 10:38:

... the NZXT C750 Gold Gen1 is a great PSU for what I am using the system for ...

The NZXT C750 Gold ...

file.php?mode=view&id=244976

... is essentially a rebadged Seasonic Focus Plus 750W Gold, good stuff ...

file.php?mode=view&id=244977

Seasonic goes the extra mile and attaches a heatsink to the minor rails' DC-DC FETs:

file.php?mode=view&id=244978

Just make sure the stupid "ZERO RPM FAN MODE" is switched off:

file.php?mode=view&id=244979

Let the air flow!

Reply 23 of 40, by shevalier

User metadata
Rank Oldbie
Rank
Oldbie

The case for my main PC is the CHIEFTEC Mesh LCX-01SL, which is based on a similar platform.
like this https://www.ebay.com/itm/175492093873
s-l1600.jpg
Over the past 20 years, it has seen a great many different pieces of hardware inside it.

Its advantages include a relatively modern design, thick metal and a large internal volume.
Unfortunately, that’s all there is to it.
With a 120mm exhaust fan running at 1,000 rpm, and the PC drawing 100 watts from the mains whilst idle (20 of which come from a rather old PSU), the temperature inside the case is 10 degrees higher than the ambient temperature.

Cases like this are sorely lacking in intake airflow, and there’s nowhere to fit 2–3 low-RPM 120–140mm fans.
You need to get rid of the HDD/CD bays and cut out the front panel.
For cable management, you need to make significant cuts to the backplate.
And add a plate to block the PSU’s air intake from the motherboard.
If I had water/laser/CNC, I could get to it. But sawing all this stuff off by hand is less than enjoyable.

As a result, this summer, I started seriously looking at the Chiftec NightHunter 3. 🙁
The classic ATX case design is a complete failure.
And now their design has taken a huge leap forward.

Aopen MX3S, PIII-S Tualatin 1133, Radeon 9800Pro@XT BIOS, Audigy 4 SB0610
JetWay K8T8AS, Athlon DH-E6 3000+, Radeon HD2600Pro AGP, Audigy 2 Value SB0400
Gigabyte Ga-k8n51gmf, Turion64 ML-30@2.2GHz , Radeon X800GTO PL16, Diamond monster sound MX300

Reply 24 of 40, by shevalier

User metadata
Rank Oldbie
Rank
Oldbie
shevalier wrote on 2026-07-02, 06:45:
Cases like this are sorely lacking in intake airflow, and there’s nowhere to fit 2–3 low-RPM 120–140mm fans. You need to get rid […]
Show full quote

Cases like this are sorely lacking in intake airflow, and there’s nowhere to fit 2–3 low-RPM 120–140mm fans.
You need to get rid of the HDD/CD bays and cut out the front panel.
For cable management, you need to make significant cuts to the backplate.
And add a plate to block the PSU’s air intake from the motherboard.

The Athlon XP decipate around 50 watts, overclocked - 70+ watts
Dual CPUs - 150 watts, + 50 watts video card
Total (including other small parts) - about 250 watts.
To blow them out, you'd have to make the case look like a Sharkoon PURE STEEL.
https://en.sharkoon.com/product//26616
https://www.techpowerup.com/review/sharkoon-p … el-atx-chassis/
PURE_STEEL_white_rgb_content_03.jpg

Aopen MX3S, PIII-S Tualatin 1133, Radeon 9800Pro@XT BIOS, Audigy 4 SB0610
JetWay K8T8AS, Athlon DH-E6 3000+, Radeon HD2600Pro AGP, Audigy 2 Value SB0400
Gigabyte Ga-k8n51gmf, Turion64 ML-30@2.2GHz , Radeon X800GTO PL16, Diamond monster sound MX300

Reply 25 of 40, by geordiepingu

User metadata
Rank Newbie
Rank
Newbie
shevalier wrote on 2026-07-02, 12:44:
The Athlon XP decipate around 50 watts, overclocked - 70+ watts Dual CPUs - 150 watts, + 50 watts video card Total (including ot […]
Show full quote
shevalier wrote on 2026-07-02, 06:45:
Cases like this are sorely lacking in intake airflow, and there’s nowhere to fit 2–3 low-RPM 120–140mm fans. You need to get rid […]
Show full quote

Cases like this are sorely lacking in intake airflow, and there’s nowhere to fit 2–3 low-RPM 120–140mm fans.
You need to get rid of the HDD/CD bays and cut out the front panel.
For cable management, you need to make significant cuts to the backplate.
And add a plate to block the PSU’s air intake from the motherboard.

The Athlon XP decipate around 50 watts, overclocked - 70+ watts
Dual CPUs - 150 watts, + 50 watts video card
Total (including other small parts) - about 250 watts.
To blow them out, you'd have to make the case look like a Sharkoon PURE STEEL.
https://en.sharkoon.com/product//26616
https://www.techpowerup.com/review/sharkoon-p … el-atx-chassis/
PURE_STEEL_white_rgb_content_03.jpg

To a degree, you're right, but I don't need to go that far to solve the problem! I accept that full towers make noise and they are imperfect. I can still achieve my goal. In a sense, I want to relive the hum my old full tower made. If I didn't, I would've bought a Silverstone FLP02 (would've probably been cheaper...)

I can squeeze 2x140mm fans into the bottom if I change the feet, which I think you suggested to do anyway. I've snapped a foot, so I may as well change them. I've found some units that will raise the case an inch off the floor and are also rubber. The GPU is staying air-cooled for now, as it may change in the near future. Being a blower-style card, it will benefit from cold air from the bottom, and I suppose if I could reverse the airflow, that would also be beneficial.

I will keep the 5x 80mm fans - they are Arctic P8 Maxes and shift some air.

The rad at the top is running 2x P12 Pros. I also have a 92mm P9 Max I can add for some additional cold intake, above the PSU, quite easily.

The trick will be making sure I get a sufficient baffle made between the exhaust of the radiator and the cut-out in the side panel window, to make sure I don't recirculate air in the case. But I will be keeping the HDD cages and 5.25" bays. I may play with the airflow direction of the 80s to see what impact they have closer to the time. I am tempted to print some TPU fan mounts with tighter tolerances than the standard fan mounts, so it acts as both a natural air gasket between the case and fan, and as a vibration dampener.

Reply 26 of 40, by H3nrik V!

User metadata
Rank l33t
Rank
l33t
geordiepingu wrote on 2026-07-02, 17:50:
To a degree, you're right, but I don't need to go that far to solve the problem! I accept that full towers make noise and they a […]
Show full quote
shevalier wrote on 2026-07-02, 12:44:
The Athlon XP decipate around 50 watts, overclocked - 70+ watts Dual CPUs - 150 watts, + 50 watts video card Total (including ot […]
Show full quote
shevalier wrote on 2026-07-02, 06:45:
Cases like this are sorely lacking in intake airflow, and there’s nowhere to fit 2–3 low-RPM 120–140mm fans. You need to get rid […]
Show full quote

Cases like this are sorely lacking in intake airflow, and there’s nowhere to fit 2–3 low-RPM 120–140mm fans.
You need to get rid of the HDD/CD bays and cut out the front panel.
For cable management, you need to make significant cuts to the backplate.
And add a plate to block the PSU’s air intake from the motherboard.

The Athlon XP decipate around 50 watts, overclocked - 70+ watts
Dual CPUs - 150 watts, + 50 watts video card
Total (including other small parts) - about 250 watts.
To blow them out, you'd have to make the case look like a Sharkoon PURE STEEL.
https://en.sharkoon.com/product//26616
https://www.techpowerup.com/review/sharkoon-p … el-atx-chassis/
PURE_STEEL_white_rgb_content_03.jpg

To a degree, you're right, but I don't need to go that far to solve the problem! I accept that full towers make noise and they are imperfect. I can still achieve my goal. In a sense, I want to relive the hum my old full tower made. If I didn't, I would've bought a Silverstone FLP02 (would've probably been cheaper...)

I can squeeze 2x140mm fans into the bottom if I change the feet, which I think you suggested to do anyway. I've snapped a foot, so I may as well change them. I've found some units that will raise the case an inch off the floor and are also rubber. The GPU is staying air-cooled for now, as it may change in the near future. Being a blower-style card, it will benefit from cold air from the bottom, and I suppose if I could reverse the airflow, that would also be beneficial.

I will keep the 5x 80mm fans - they are Arctic P8 Maxes and shift some air.

The rad at the top is running 2x P12 Pros. I also have a 92mm P9 Max I can add for some additional cold intake, above the PSU, quite easily.

The trick will be making sure I get a sufficient baffle made between the exhaust of the radiator and the cut-out in the side panel window, to make sure I don't recirculate air in the case. But I will be keeping the HDD cages and 5.25" bays. I may play with the airflow direction of the 80s to see what impact they have closer to the time. I am tempted to print some TPU fan mounts with tighter tolerances than the standard fan mounts, so it acts as both a natural air gasket between the case and fan, and as a vibration dampener.

Blower style gpu, but am I right that it expels the hot air inside the case?

As for baffles for fans; may I suggest the eternal joy of owning a 3D printer? 😎

If it's dual it's kind of cool ... 😎

--- GA586DX --- P2B-DS --- BP6 ---

Please use the "quote" option if asking questions to what I write - it will really up the chances of me noticing 😀

Reply 27 of 40, by geordiepingu

User metadata
Rank Newbie
Rank
Newbie

Yes, that is why I’m considering reversing the airflow, as directionally it blows it out of the front.

Mind you when I look at the proportion of intake air coming into the case with bottom feed fans, I could probably suck it and see, the delta temp at the radiator might be ok (saying from experience of doing dumb water cooling things)

And yes, I need to invest in my own printer. I keep contracting services to print (albeit at a favourable rate). There’s some plenums I’ve been designing for yonks for a rover v8 that I need to start test printing at home… I was thinking of just gluing together some offcuts of acrylic and putting some foam tape on to see what happens first!

Reply 28 of 40, by shevalier

User metadata
Rank Oldbie
Rank
Oldbie
geordiepingu wrote on 2026-07-02, 17:50:

I can squeeze 2x140mm fans into the bottom if I change the feet, which I think you suggested to do anyway. I've snapped a foot, so I may as well change them.

I broke this paw on the second day of owning the case 20 years ago.

You're planning on using liquid cooling, right?
If I were you, I'd install two 140mm fans on the bottom and a liquid cooling radiator on the top cover.
If it has two 120mm fans, then together with two 80mm fans on the rear panel, there will be a balance between the fan surfaces area and the airflow volumes.
You'll just have to trim the plate from the 5.25 bay to the rear panel so it doesn't interfere with airflow from the bottom up.
The biggest challenge is making a hexagonal (or square, depending on the case family) mesh on the top cover, the same as the rear fans, to maintain a consistent overall look.
But without laser or waterjet cutting, this is practically impossible.
Although, yes. You can 3D print a mesh that matches the overall tone of the case.

Aopen MX3S, PIII-S Tualatin 1133, Radeon 9800Pro@XT BIOS, Audigy 4 SB0610
JetWay K8T8AS, Athlon DH-E6 3000+, Radeon HD2600Pro AGP, Audigy 2 Value SB0400
Gigabyte Ga-k8n51gmf, Turion64 ML-30@2.2GHz , Radeon X800GTO PL16, Diamond monster sound MX300

Reply 29 of 40, by shevalier

User metadata
Rank Oldbie
Rank
Oldbie

Chieftec Aegis CH-02B-B
012.jpg

015.jpg

This solution is quite in keeping with Chieftec's style, as are the fans in the bottom of the case (but that happened 5 years later).

Aopen MX3S, PIII-S Tualatin 1133, Radeon 9800Pro@XT BIOS, Audigy 4 SB0610
JetWay K8T8AS, Athlon DH-E6 3000+, Radeon HD2600Pro AGP, Audigy 2 Value SB0400
Gigabyte Ga-k8n51gmf, Turion64 ML-30@2.2GHz , Radeon X800GTO PL16, Diamond monster sound MX300

Reply 30 of 40, by geordiepingu

User metadata
Rank Newbie
Rank
Newbie

I would call this morning a success, although it didn't go 100% to plan. Still need to get some more practice, but I do have 2x finished 140mm fan mounts in the bottom of the case now. Unfortunately, I cut a bit too wide between the two fan duct holes, so I blended it into one big cavity, knowing I have a magnetic 280mm filter that will fit over the top and hide it (even if it is on the bottom of the case). I used the jigsaw over the CAD template, which seemed to work well enough. I then finished it with a drum sander on an air grinder. That said, I wonder if for the 120 mm fans, I could get a better result using a 4.5" holesaw and then finishing with the drum sander. I will try this on one of the radiator mounting brackets when the steel comes. I will stick to the side-mount above the PSU for now, knowing I can use that to practice a bit more. I took out some of the "lumps and bumps" from the case - presumably something to do with the feet - using a die grinder. I have some ZG90 I'll paint the interior with when I'm done, to keep the authentic zinc coated look inside.

file.php?mode=view&id=245071
file.php?mode=view&id=245069
file.php?mode=view&id=245070

I have also ordered my feet for the case. These should pick it up an inch off the floor, absorb some of the noise being rubber, and simply bolt in with some M10 bolts, washers and nuts. We'll see how stable they are when they arrive...
file.php?mode=view&id=245073
file.php?mode=view&id=245074
I did find these filters by Silverstone for 120mm fans. They integrate a grille but also have that round grill raised to the dimension of the fan profile. This might look ok on the top of the case, albeit there are Silverstone logos. I could possibly remove the filter and paint a pair of them when I paint the exterior of the case. I'm still thinking about a solution for if I feel like I can make the top cutouts neat enough.

Reply 31 of 40, by shevalier

User metadata
Rank Oldbie
Rank
Oldbie

I'm not an expert on liquids and gases, but common sense dictates that the cross-sectional area of ​​the housing shouldn't be less than 2 x 140 mm of the fan.
This is the surface area that needs to be eliminated.

Overall, it's cool. I've always envied people who can cut something perfectly along a line.

Aopen MX3S, PIII-S Tualatin 1133, Radeon 9800Pro@XT BIOS, Audigy 4 SB0610
JetWay K8T8AS, Athlon DH-E6 3000+, Radeon HD2600Pro AGP, Audigy 2 Value SB0400
Gigabyte Ga-k8n51gmf, Turion64 ML-30@2.2GHz , Radeon X800GTO PL16, Diamond monster sound MX300

Reply 32 of 40, by geordiepingu

User metadata
Rank Newbie
Rank
Newbie

In time, I still need to figure out how I want to approach it!

Reply 33 of 40, by shevalier

User metadata
Rank Oldbie
Rank
Oldbie
geordiepingu wrote on Yesterday, 09:30:

In time, I still need to figure out how I want to approach it!

Listen, for now, the case is disassembled.
Cut out a proper, large rectangular hole in a backplate.
If you bend the 5mm edges 30-45 degrees, the rigidity will increase significantly, even compared to a plate. 😀
This curly cut for water blocks is completely out of place....

Aopen MX3S, PIII-S Tualatin 1133, Radeon 9800Pro@XT BIOS, Audigy 4 SB0610
JetWay K8T8AS, Athlon DH-E6 3000+, Radeon HD2600Pro AGP, Audigy 2 Value SB0400
Gigabyte Ga-k8n51gmf, Turion64 ML-30@2.2GHz , Radeon X800GTO PL16, Diamond monster sound MX300

Reply 34 of 40, by TELVM

User metadata
Rank Oldbie
Rank
Oldbie

That's the spirit, Geordiepingu! Let the air flow!

A similar hack that here your servant perpetrated on a Corsair Carbide Air 540, two extra 140mm at the bottom:

file.php?mode=view&id=245076

file.php?mode=view&id=245077

^ Notice the new ghetto feet made from alumimun strip, to raise the case from floor or table top. Because we want at lest one fan diameter of clearance for the fans to breathe adequately.

file.php?mode=view&id=245078

OEM similar stuff in a Cooler Master SL600M (though here they only raised it by less than half a fan diameter):

file.php?mode=view&id=245079

file.php?mode=view&id=245080

Let the air flow!

Reply 35 of 40, by shevalier

User metadata
Rank Oldbie
Rank
Oldbie
TELVM wrote on Yesterday, 10:12:

That's the spirit, Geordiepingu! Let the air flow!

A similar hack that here your servant perpetrated on a Corsair Carbide Air 540, two extra 140mm at the bottom

A typical modern ATX power supply has an efficiency of 90%, meaning that for every kilowatt of power it must dissipate 100 watts of heat.
However, the noise level is must acceptable to the user.
Considering that the power supply fan is now located at the bottom, and the case feet are about 2.5 cm high (0.00027 times the length of a football field 😀, raising the case very high clearly doesn't make sense.
Unless, of course, you have a PTX5090. I have no idea what case they require.

Considering that Chieftecs cases like this one are prone to rattling from hard drives, rubber feet are essential.
One-inch feet are perfectly adequate.

Aopen MX3S, PIII-S Tualatin 1133, Radeon 9800Pro@XT BIOS, Audigy 4 SB0610
JetWay K8T8AS, Athlon DH-E6 3000+, Radeon HD2600Pro AGP, Audigy 2 Value SB0400
Gigabyte Ga-k8n51gmf, Turion64 ML-30@2.2GHz , Radeon X800GTO PL16, Diamond monster sound MX300

Reply 37 of 40, by geordiepingu

User metadata
Rank Newbie
Rank
Newbie

Still had some time to tinker and think... Figured I would play with the bench top shot blaster, seeing as I was drilling rivets out, to clean up the corrosion on the HDD sleds and the frame. A couple of coats of zg90 and I'll leave it to dry while I go BBQ. I wanted to keep the curved frame as it is a feature of the Dragon.

Some pics attached, all self-explanatory, I hope!
file.php?mode=view&id=245085
file.php?mode=view&id=245088
file.php?mode=view&id=245087
file.php?mode=view&id=245086
file.php?mode=view&id=245084

Reply 38 of 40, by geordiepingu

User metadata
Rank Newbie
Rank
Newbie

Had another couple of hours tinkering with the benchtop shot blaster. By a stroke of madness/genius (you decide), I figured the case would fit in if I disassembled it. So to improve the finish and take out more corrosion, I drilled out all of the rivets and blasted each panel.

Obviously, to do the HDD cage, I had to drill the retainer off to remove the latch. My plan to reinstate this is to drill and tap an M6 thread and refit with a pan-head screw and washer, with a bit of Loctite so I don't have to torque it up.

Unfortunately, I've run out of ZG90, so the panels will have to sit in the corner of my office.

I need to think about what colour I should paint the exterior, as it will be easier to paint in bits than to reassemble. Ridiculous, me says Rolex Blue or Midnight Purple, but I'm not yet decided.

In other news, I have purchased a Sapphire HD 3850 AGP for this machine. I found one at a reasonable price, so I snapped it up. It should arrive next week.

file.php?mode=view&id=245160
file.php?mode=view&id=245158
file.php?mode=view&id=245159
file.php?mode=view&id=245157

Reply 39 of 40, by shevalier

User metadata
Rank Oldbie
Rank
Oldbie
geordiepingu wrote on Today, 15:35:

In other news, I have purchased a Sapphire HD 3850 AGP for this machine. I found one at a reasonable price, so I snapped it up. It should arrive next week.

You have to experience this firsthand. 😀
First, you buy an AGP DX10 graphics card (I have a 2600PRO), and only then do you realize it's useless.
It's underperforming for "relatively new" games and poorly compatible with older ones.
For such builds, an X800-type graphics card (or at most an X19xx) is optimal.

Aopen MX3S, PIII-S Tualatin 1133, Radeon 9800Pro@XT BIOS, Audigy 4 SB0610
JetWay K8T8AS, Athlon DH-E6 3000+, Radeon HD2600Pro AGP, Audigy 2 Value SB0400
Gigabyte Ga-k8n51gmf, Turion64 ML-30@2.2GHz , Radeon X800GTO PL16, Diamond monster sound MX300