VOGONS


CF Card on a 486

Topic actions

Reply 20 of 28, by VintageUniverse

User metadata
Rank Newbie
Rank
Newbie

Those internal case parts are very rare, reckon you have to tear a broken machine for parts for that part 😜 What model is it? Here's the video of mine should clear up more mysteries 😀 :
https://www.dropbox.com/s/r74k3qaqb9cblx1/PB23CD.MTS?dl=0

Kind Regards,
VintageUniverse

Reply 21 of 28, by ReeseRiverson

User metadata
Rank Member
Rank
Member
Anuextreme117 wrote:

Those internal case parts are very rare, reckon you have to tear a broken machine for parts for that part 😜 What model is it? Here's the video of mine should clear up more mysteries 😀 :
https://www.dropbox.com/s/r74k3qaqb9cblx1/PB23CD.MTS?dl=0

Yeah, that's probably what I'll have to do.

Huh, yours has an auto option for the HDD? Could be a newer 486 BIOS feature then, since your system uses the newer case.

My Acer reports my 2GB Transcend CF card is: Cylinder: 3884 Head: 16 Sector: 63

Usually you go to user defined on the HDD setup, and if the BIOS ISN'T limited to smaller drives, then you may see it report something like 1911MB. However, if the HDD size it gets from the user defined entry is no where near the size of your CF drive, then it is a safe bet your BIOS has a limit to what it supports. I would try a 512MB CF card to start with, if I were you. Maybe even a 1GB if one is available.

Also, be sure your IDE cable's red stripped end, is on pin one of the Packard Bell motherboard. Then pin 1 on the CF to IDE adapter.

Also, here's the picture you requested:

IMG_0317.JPG

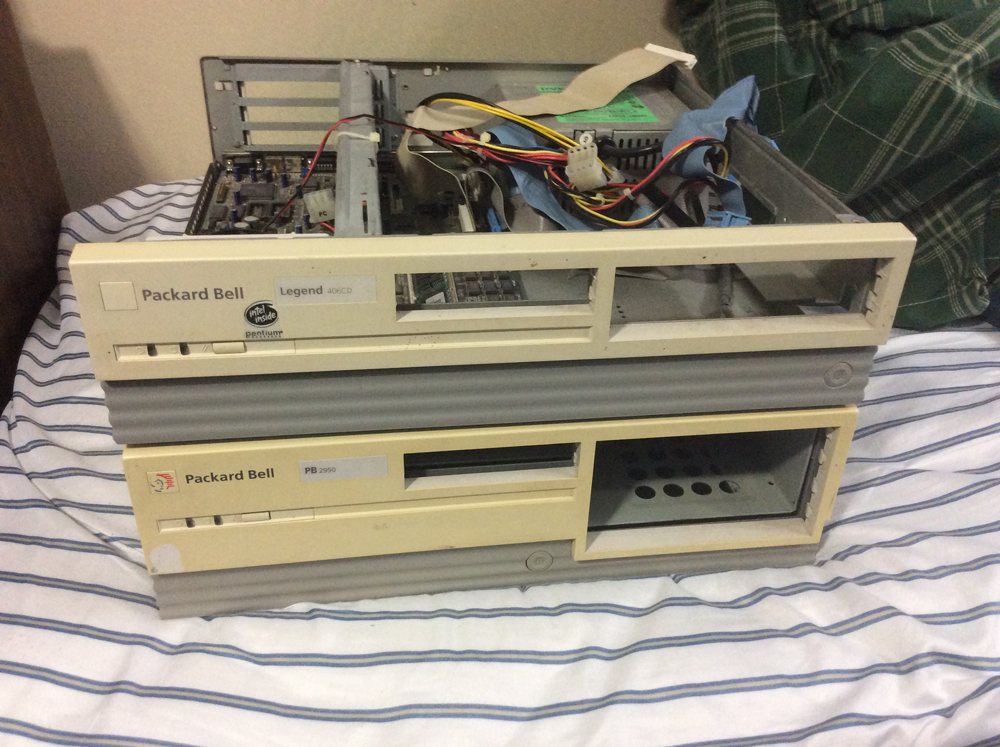
Both of these actually had the Pentium processors. Though a long time ago, I idiotically swapped the bigger Packard Bell's motherboard for the 486 board. 😵 Now I need that 486 board in my older case... I need to get a motherboard and ISA/PCI card for the empty case. I guess I could easily put the motherboard I have in the smaller case into the bigger case, only issue is the PCI/ISA card is not the tall version, but it'd still likely work okay. 🤣

Reply 22 of 28, by VintageUniverse

User metadata
Rank Newbie
Rank
Newbie

Reese, I don't get what you mean by the "stripped end", how do I plug in the cable. I am afraid that I do not have a 512 or 1GB CF card lying around anywhere I have 3 Transcend 2GB which was meant for my Platinum 1 I never new I was going to get this. I spent over $400 bucks on 3 mobos, and I am literally almost broke. I need to work after the holidays. Do you have a spare I can borrow? I believe your conclusion is correct. Thanks.

P.S. For that mounting bracket, find a broken Packard Bell 3x3 around your state, eBay prices are ridiculous! Do you have the Mobo for the PB 2950?

Kind Regards,
VintageUniverse

Reply 23 of 28, by ReeseRiverson

User metadata
Rank Member
Rank
Member

See the red stripe on this picture?
ide.jpg

That's what I mean. Some cables it's pretty faint. 😀

Smallest I have is a 2GB as well. 🤣 But go ahead and check the IDE cable first and see. 😀

Yeah I will check around sometime. Also I don't think I do have the board anymore. 😢

Reply 24 of 28, by VintageUniverse

User metadata
Rank Newbie
Rank
Newbie

It has it, so how do I plug it in? where can i get a backup battery power source, my cmos is been dead for over 10 years now 🤣. it is a Br1225

Kind Regards,
VintageUniverse

Reply 25 of 28, by devius

User metadata
Rank Oldbie
Rank
Oldbie
Anuextreme117 wrote:

It has it, so how do I plug it in?

The red strip should be on the same side as pin 1 on the connector: http://www.kids-online.net/learn/click/details/idecab.gif Usually pin 1 is marked with a little 1 on the motherboard, or if it isn't, it should be indicated in the manual.

Reply 26 of 28, by ReeseRiverson

User metadata
Rank Member
Rank
Member

Hmm, it appears that link won't work.

Let's try this... This is an old ISA controller. On the left of the picture is the ide header. On the top, you can see 1 and 2. This is where you have the red side at. http://i301.photobucket.com/albums/nn63/dk486 … G_0343-1024.jpg

Now sometimes these are marked with an arrow. This could be the case on the CF to ide adapter.

As seen in this picture: http://www.vesalia.de/pic/cfide40adapterslot.jpg

Reply 27 of 28, by VintageUniverse

User metadata
Rank Newbie
Rank
Newbie

Alright guys, it has been a while. I was an idiot and I somewhat screwed up my PB450+ Motherboard, Apparently I need a new one. I am looking for a PB450+ Motherboard with the Packard Bell BPCS Number: 180592. I am also missing the front trim panel for my Legend 23CD and the left side trim panel for it as well. I completely stripped down the computer and found an annoying bit of rust on the metal interior sadly, which the case is almost PERFECT! 😜 Does anyone know any substance that will remove rust and restore the original look of computer case metal. How can I remove the yellowing on the case? How can I replace the DEAD CMOS on the board as well. Lot to do....

Pictures IMPORTANT:
https://www.dropbox.com/sh/o95vkqfvuxhgmh6/AA … RzHRDmM8oa?dl=0

Kind Regards,
VintageUniverse

Reply 28 of 28, by devius

User metadata
Rank Oldbie
Rank
Oldbie
Anuextreme117 wrote:

Does anyone know any substance that will remove rust and restore the original look of computer case metal. How can I remove the yellowing on the case?

If the rust is only superficial you may be able to remove it, but if it's been rusty for many years it will have eaten into the metal by now, which will make it a bit harder to remove. In any case you should use zinc or chrome spray paint to restore the case to its past glory. Here's what you could do:

  1. With sandpaper (something between 200-400 grit) sand it until all the rust is gone or there are only a few black spots left (requires patience)
  2. Clean it thoroughly with water and mild soap. In fact you can even sand it while it's wet, so you can combine these two steps in one
  3. Dry it ASAP with a cloth or paper towels and even with a blow dryer for quicker results
  4. Leave it to dry completely for some time (1 day is what I usually wait)
  5. Protect any parts that are not supposed to be painted over with masking tape (again, patience is required)
  6. Use zinc or chrome paint depending on what the original look of the case is, or what you prefer (I prefer zinc myself)
  7. Treat one side at a time waiting at least 1 hour before working on the next one and repeat the following step for each:
  8. Apply the paint in several cross layers with a few minutes in between, that is first apply a thin layer of paint (don't worry if you can still see the rust) in one direction only (from left to right for example), then wait 5-10 minutes (the paint can should come with instructions specifying the time between layers) and apply another coat but perpendicular to the last one (top to bottom for example). Repeat the process for as many coats of paint as needed until everything is properly covered, which would probably be around 3-5.
  9. Leave it to dry for a few hours before doing any work on it
  10. Rejoice with your brand new looking case