Throughout this thread, I've been documenting my pursuit of what I've dubbed "the fastest 386 in the west".
My exploration began with the initial post examining a relatively modest PC-Chips M321. Since then, i went through basically every significant motherboard and chipset available for the 386 platform. This methodical process has been driven by my desire to identify the absolute pinnacle of 386 performance.
From all tested assemblies, two distinguished themselves as exceptional:
DTK PEM-4036Y paired with IBM BL3 processor running at 100MHz (2x50).
And MicroStar MS-3124 with IBM BL3 processor running at 110MHz (2x55).
Among the rest were two Alaris Cougar II (Cobalt-AT 486BL) boards that showed potential but were not able go past their standard specs of 3x25MHz (or 2x40MHz) to be of interest. This made me form a negative opinion about the Cougars which i expressed in some posts. Nevertheless, the potential i sensed in them pushed me to continue my experiments. Eventually, I acquired two more Cougar boards, which led to a very satisfying result that I will document in this post.
As they say - third time is the charm (third major attempt at the fastest 386) and the right place to set the record straight about the Cougars.
Several years ago, I acquired a complete PC system featuring an Alaris Cougar motherboard, Cirrus Logic GD-5429 video card, Sound Blaster AWE32, CD-ROM drive, floppy drive, hard disk drive, power supply unit, and a computer case.
The original owner, based in the UK, had set out to build the fastest 386 rig possible; however, the project extended beyond his expectations, and he eventually lost motivation. He offered me a generous discount and entrusted me with the task of completing the build, which I accepted. Finally, i reached the point of fulfilling that commitment.
While discussing history, i will briefly touch on the Alaris Cougar story for additional context.
Back in 1993-1994 the home and office computer markets were rapidly evolving.
The first Pentium processors occupied the upper market segment along with 486DX4.
486DX and 486DX2 in the middle.
And a zoo of options for the commoners.
Two companies - Ambra (IBM in disguise) and Alaris - aimed at that base with two offerings.
Alaris Cougar EnergySmartPC BL3X/75

Ambra Lightning 100

The business strategy is quite evident with these systems: offer respectable baseline performance at an attractive initial price point through the BL3 processor and provide upgrade flexibility via the included Socket2 (Alaris) or Socket3 (Ambra). Based on current availability of these motherboards, this approach appears to have been successful for Alaris, as their Cougar boards remain relatively common even 30 years later-suggesting they achieved substantial sales volume during their production run. The same cannot be said for Ambra/IBM products, which are MIA.
User Bitwrangler had a go at a Patriot made PC which apparently sports the same motherboard produced by IBM and used in the Ambra Lightning rigs - link.
Another user - wbahnassi has a cool thread with photos about this motherboard as well - link.
What's particularly noteworthy is that the Ambra system operated at 100MHz, while Alaris restricted their offering to 75MHz.
The Ambra exhibits characteristics I find typically IBM in nature - a non-standard form factor paired with a non-standard riser card, and incorporates built-in components of often questionable quality. In this case an ok video card but a subpar IDE controller.
In comparison, the Alaris Cougar II design appears almost conventional.
Anyway. Fast forward to the present and what i think is the fastest 386-class PC around.
It is important to emphasize that I am not conducting a limited overclocking experiment, but building a complete, fully-functional computer system with all the gear that goes into it. This represents a practical, everyday-usable PC rather than just a theoretical speed test.
So, let me go through the components, from interior to exterior.
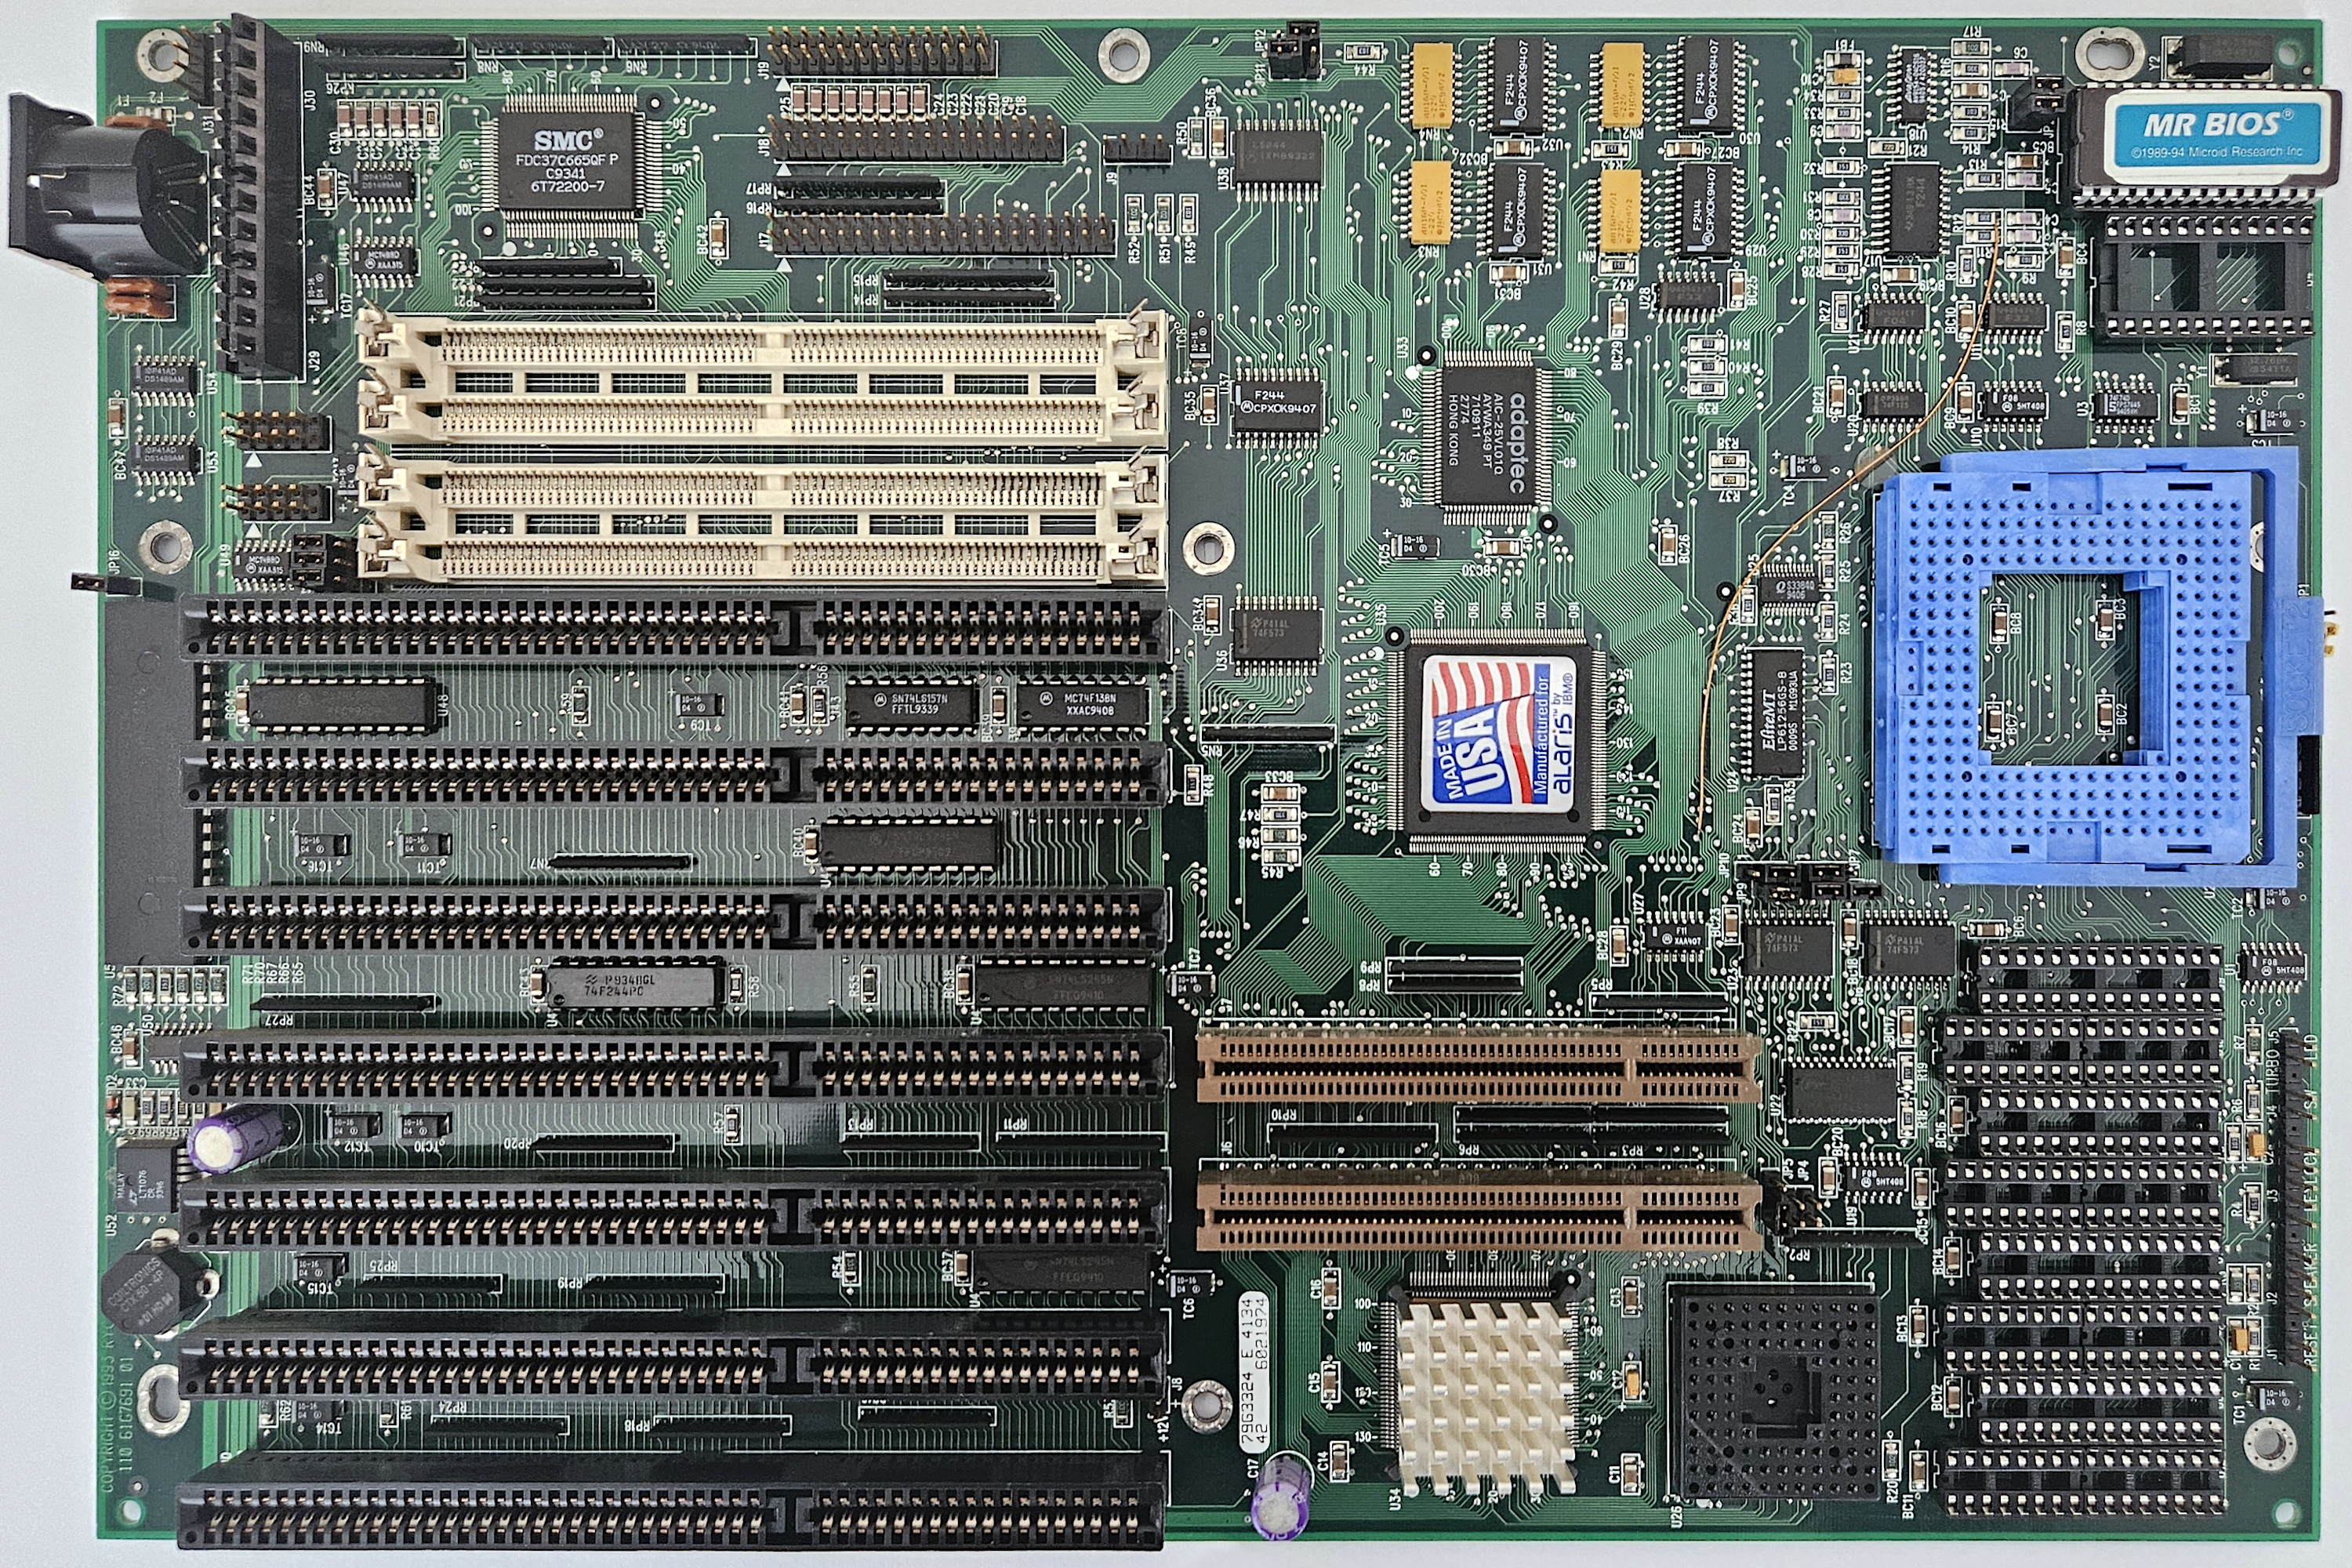
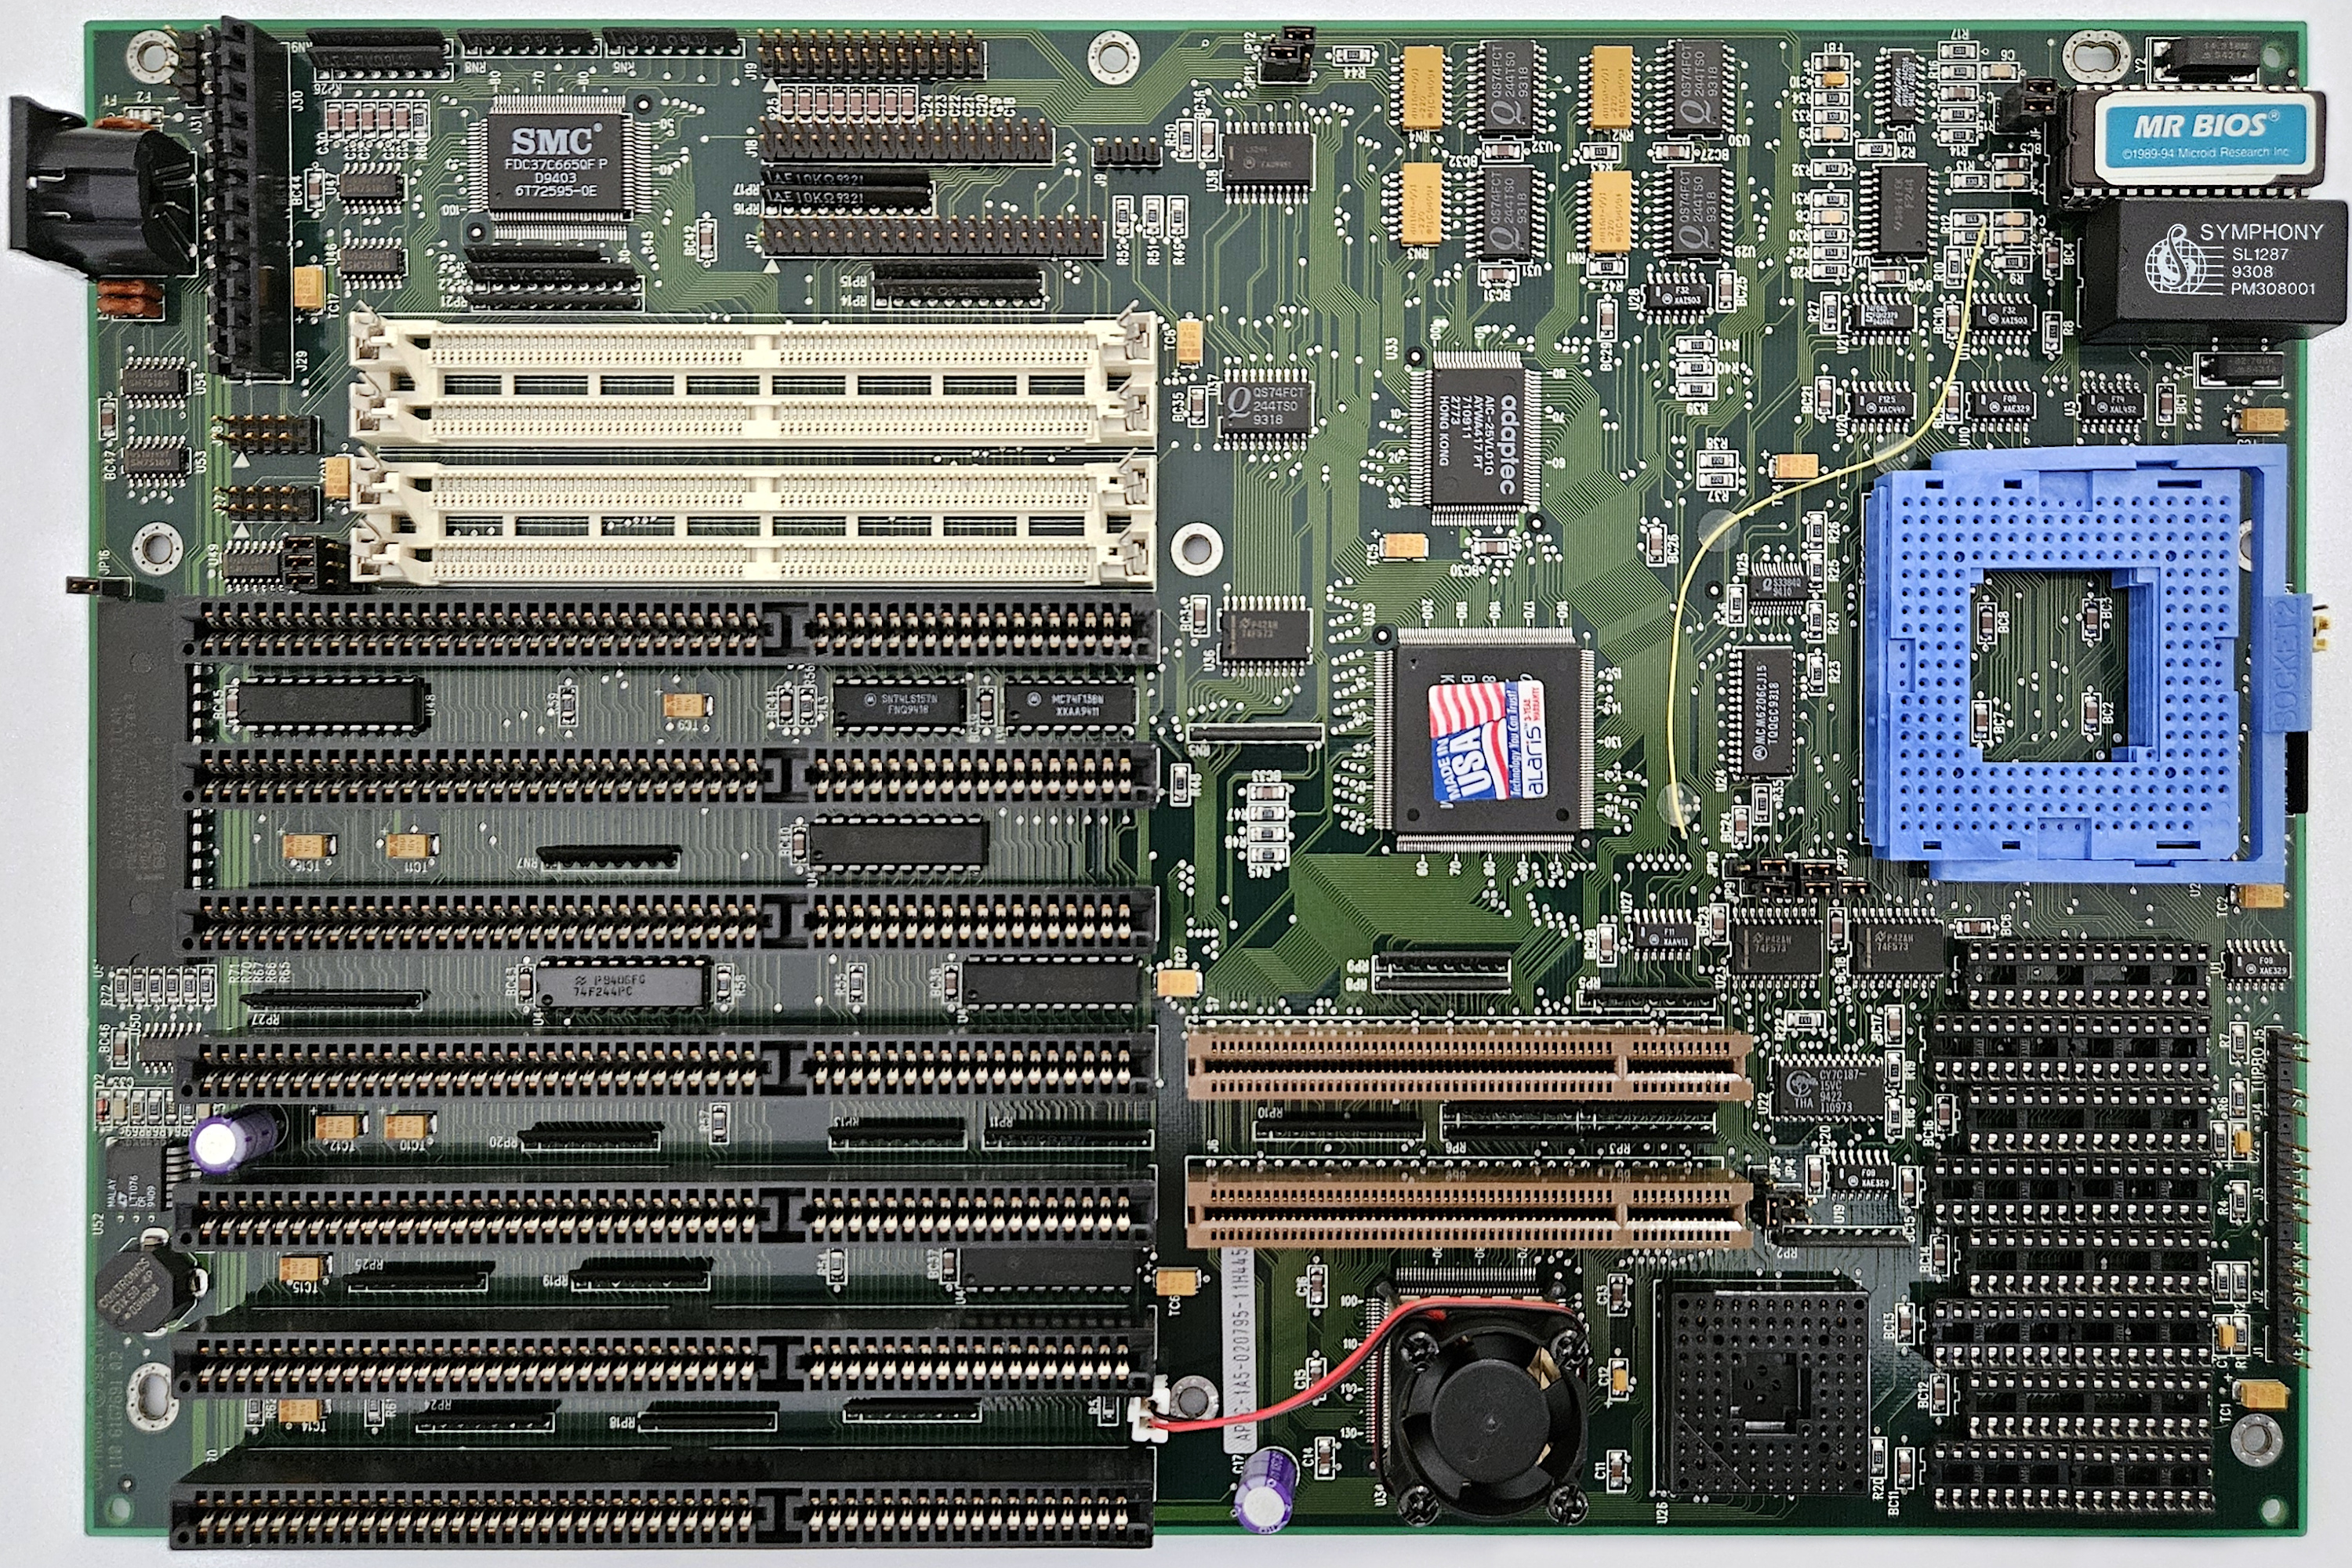
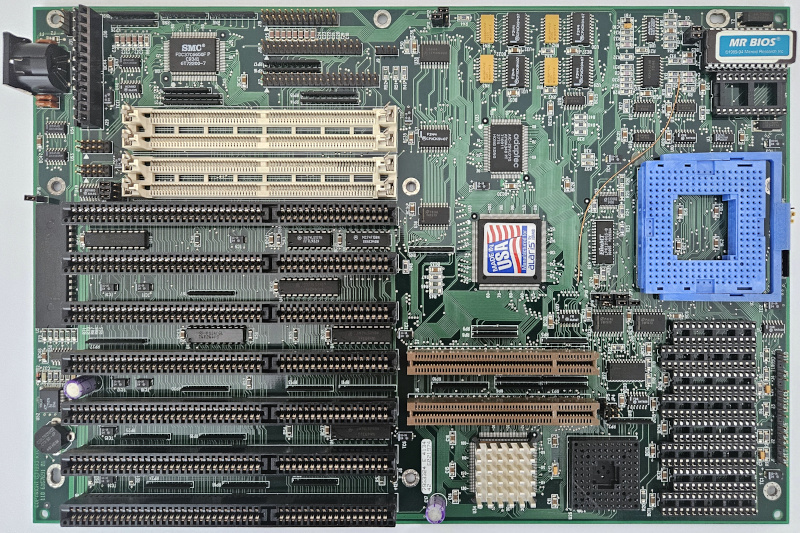
Alaris Cougar II (Cobalt-AT 486BL) (OPTi ‘Premium’ - 82C499 B) - the fastest hybrid (VLB/ISA) 386-class motherboard:
Over the years i accumulated four of these assemblies.
The first two didn't overclock well and were detailed in my previously linked post. They operate at its stock 75MHz (3x25) which is nothing to write home about. This is especially obvious in the consolidated benchmark results posted here - reference the Alaris Cougar II 75MHz entry specifically.
The latter two (showcased below), however, can operate stably at 50MHz FSB and 100MHz CPU with conventional air cooling, which represents the key differentiating characteristic.
However, additional step is needed to achieve that, namely:
The onboard clock generator is restricted to outputting only 25, 33, 40, or 50 MHz. For optimal performance, the CPU needs to operate between 100MHz and 110MHz. The standard Mr.BIOS enforces 3x CPU frequency multiplier, the only feasible option becomes a 33MHz base clock, yielding 100MHz - but this configuration still delivers underwhelming results.
Fortunately, two alternative BIOS versions exist that address this limitation. They are functionally identical except how the CPU clock multiplier is set during POST. With them, the ideal 100/50 MHz performance configuration can be achieved.
- a no multiplier version, which requires standard software drivers such as LIGHT486, PK486BL, or REVTO486
- a version with hardcoded 2x multiplier
The attachment alaris_cougar_bios_M27C512_noCRC_noMSR.zip is no longer available
This one handles all BIOS settings on max, except LEVEL 2 CACHE WRITE = 1 WS (best is 0) otherwise POST hangs.
This one is a flawless, zero wait-states, all BIOS settings on max, assembly.
IBM BL3 processor running at 100MHz (2x50), on air cooling
50MHz VLB
33.33MHz ISA
512Kb level 2 cache
16Mb RAM
This motherboard was selected to form the basis of the PC.

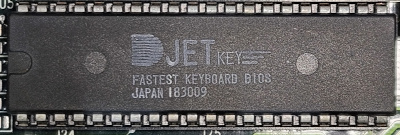
The keyboard controllers these Cougar motherboards come with are inadequate when operating at such overclocked frequencies. They must be replaced with Jetkey-branded ones, which are conveniently labeled for what they are. However, even with them, the soft reset function (CTRL+ALT+DEL) causes the system to hang, requiring hard reset instead. While not an ideal situation it is not a blocker in any way.
processor and cooling:
As I demonstrated earlier in this thread, these IBM BL3 processors reliably operate at 100MHz with no stability issues. My testing has shown they can actually achieve even higher frequencies - 110MHz or beyond - when active cooled using Peltier elements. 100MHz can be easily achieved on air cooling.
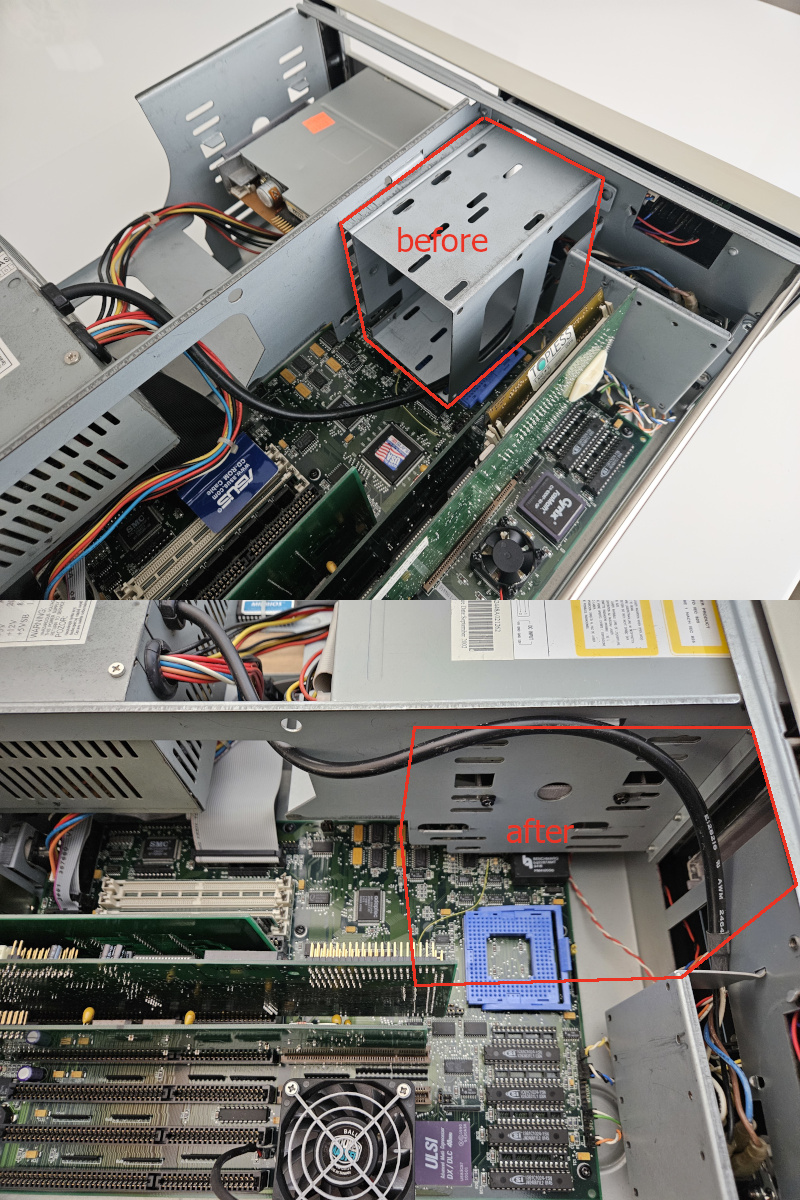
Unfortunately, the CPU is soldered in a particularly problematic location on the motherboard, situated in close proximity to the ISA/VLB slots, which severely restricts the dimensions of compatible heatsinks and fans, as well as attachment options.
My initial cooling approach utilized a 25x25mm fan directly mounted to the standard CPU heatsink (visible in the picture above). While this configuration functioned adequately on an open test bench, once installed within the computer case, thermal issues emerged and compromised system stability. A more effective cooling solution was necessary.
This led me to design and 3D print a custom mounting structure that securely attaches to the standard heatsink while working around the spatial constraints. The design accommodates a larger fan, significantly improving cooling capacity despite the motherboard's limitations. I like to think about the resulting assembly, pictured below, as an air-compressed wind tunnel. It inserts into the 4 corner fins of the heatsink. Can be separated by applying the right amount of force, but it took several iterations to get everything just right.

level 2 cache - 4x1024k 15ns ISSI:
These motherboards prove extremely particular about which level 2 cache chips they'll accept, especially when attempting to achieve zero wait-state operation.
Finding the appropriate chips required considerable experimentation. All my proven cache chips - ones I knew could reliably handle speeds up to 83MHz - were rejected. Instead, success came from seemingly random 15ns rated ISSI ones, but hey, I'll take it.
During this extensive trial-and-error process of swapping different cache chips, I began to doubt whether zero wait-state system was actually achievable. This led me to explore alternative approaches, including replacement of other related components. One visible outcome is the 8ns TAG RAM in the first motherboard above, etc.
Eventually, however, I discovered a working configuration for the second of the boards without requiring these additional modifications.
With sufficient dedication, the first motherboard could also be configured for zero wait-state operation. It would simply require investing the time to identify the four magical chips.
RAM:
The Cougars are not selective about RAM quality.
Any 70ns 16Mb memory module functions without issue, even under extreme overclocking conditions with zero wait-state settings enabled. However, stability issues can emerge when populating multiple memory slots simultaneously.
For optimal reliability, I've found it best to utilize a single memory module.
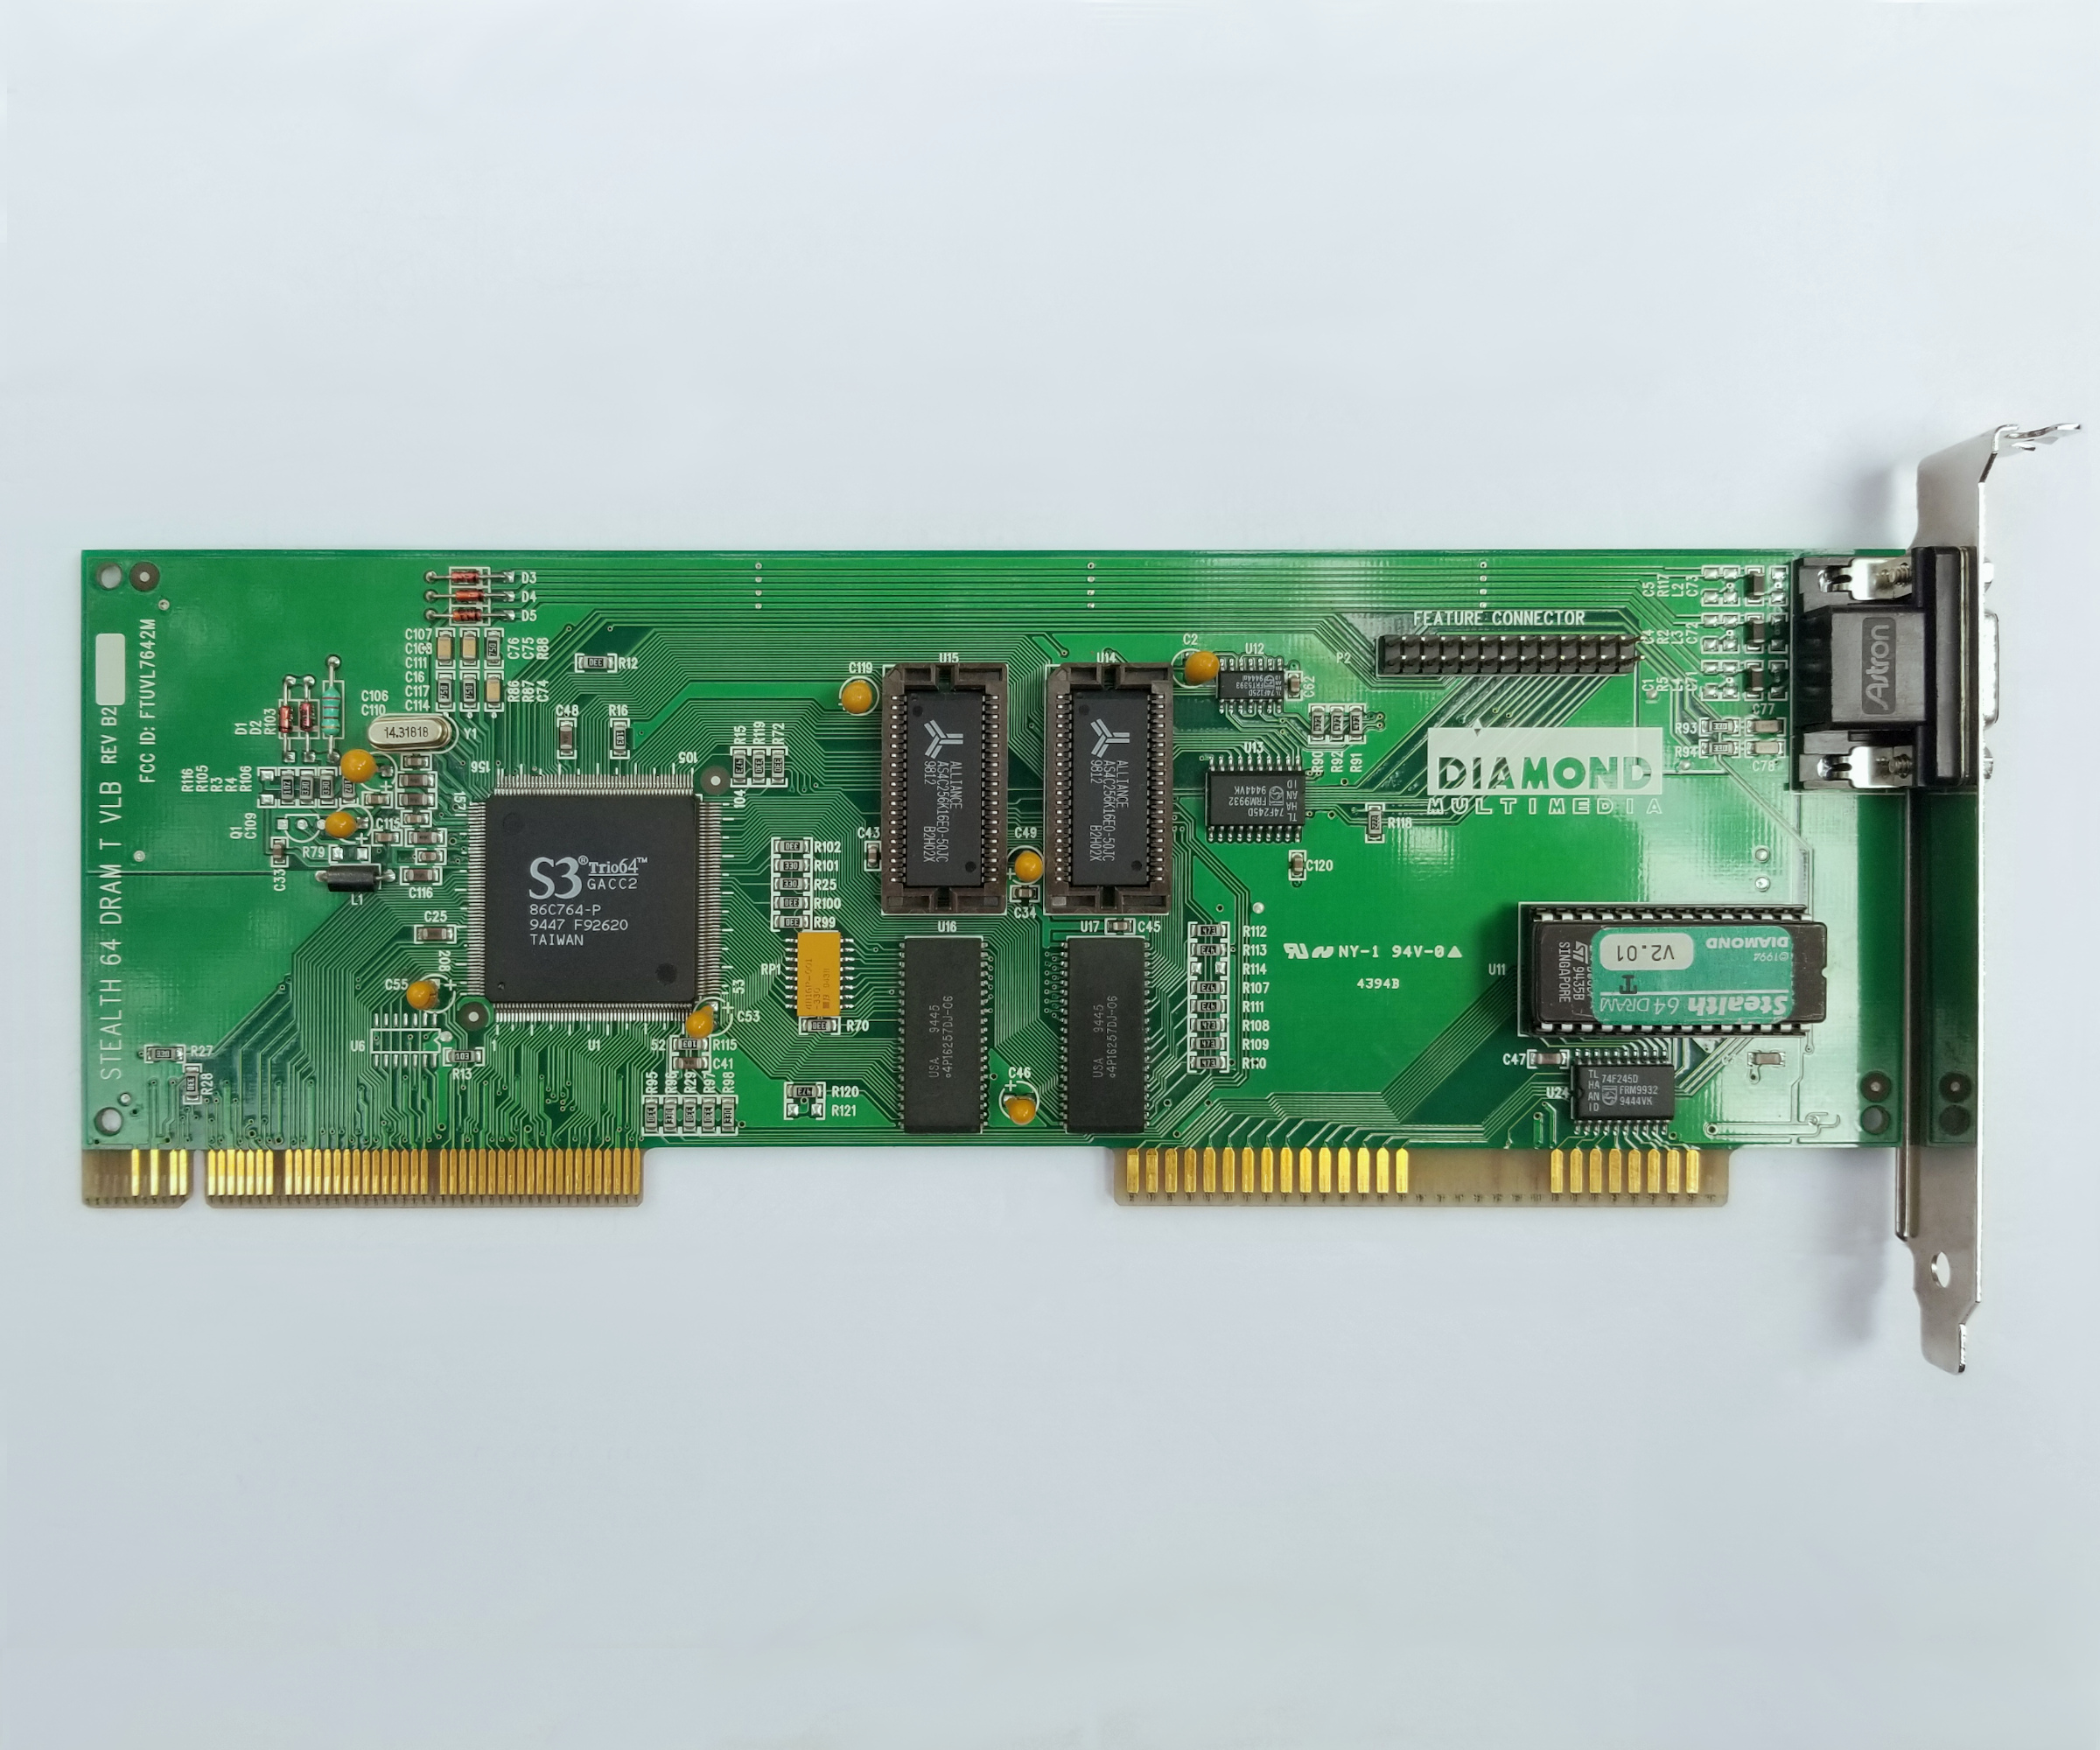
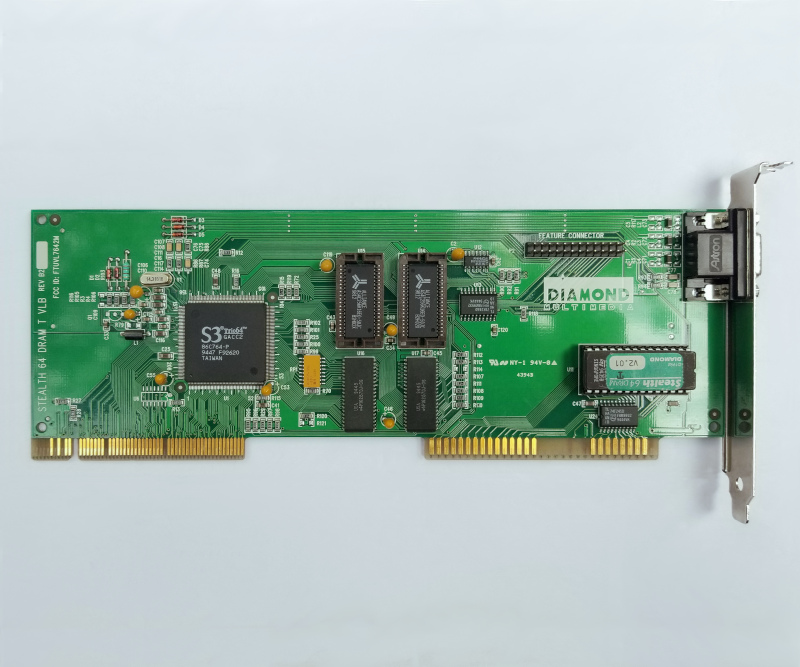
video - Diamond Stealth 64 DRAM T VLB REV B2, 2Mb (S3 Trio64 86C764-P / X):
After evaluating the various VLB video cards previously benchmarked here. I selected the most capable ones, including the Ark1000VL, S3 Trio64, Madao's S3 Trio64V+, and several others.
When tested in my 50MHz VLB zero wait-states system, only one card performed satisfactorily - the Diamond Stealth 64 DRAM T VLB REV B2. All other cards either failed to initialize, exhibited stability problems, or displayed visual artifacts. This result isn't particularly surprising, as this specific Diamond model has demonstrated great tolerance in other extreme overclocking scenarios.
The Ark1000VL functioned properly only when configured with 1 wait-state, which reduced its performance compared to the Trio64. I had high expectations for Madao's S3 Trio64V+ in combination with the reference S3 zero wait-state BIOS, but it failed to initialize at all. Based on these results, I selected the Diamond card for the build.
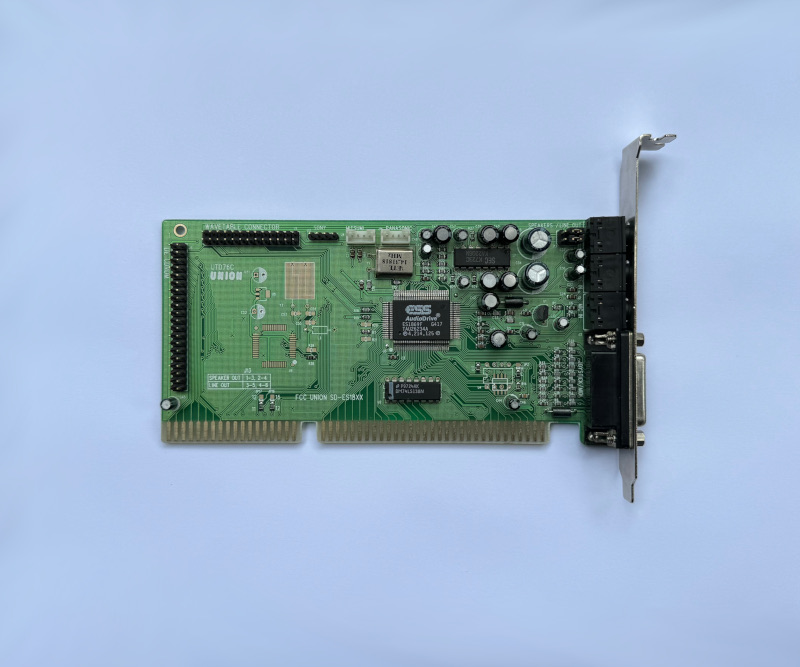
sound - Union UTD76C (ESS1869F):
I started with the SoundBlaster AWE32 CT3980 that came with the purchased computer but immediately encountered resource conflicts with the Cougar motherboard's onboard game port. After deactivating the sound card's game port, I was able to get past that issue, only to discover additional conflicts preventing digitized sound reproduction in DOS.
Tested and several different SoundBlaster 16 models, but encountered identical issues. Despite investing considerable time troubleshooting these conflicts, I was unable to resolve them. Rather than allowing this to become a roadblock, I switched to a Sound Blaster Pro 2, which functioned flawlessly. Go figure.
However, another consideration (which I'll detail below) led me towards a generic ESS1869F audio card that includes a standard IDE interface for CD-ROM connectivity. Despite their unassuming appearance, these ESS cards are excellent in every way. At the end, the experienced problems guided me toward the better overall audio solution.
Interestingly enough all sound cards worked just fine with the 33.33MHz ISA bus, contrary to my expectations.
local storage - onboard Adaptec AIC-25VL01Q:
My original plan was to use a Promise EIDE2300Plus VLB controller, but this proved unworkable as the overclocked zero wait-state system became unstable when a second VLB expansion card was installed. Despite multiple attempts to resolve this issue, I was unable to achieve stability with both VLB cards present.
Consequently, I had to rely on the motherboard's integrated Adaptec AIC-25VL01Q controller (an Appian ADI/2 in disguise). While not equivalent to the Promise EIDE2400Plus in performance, this controller still delivers excellent throughput for a 386-class system. Being a VLB-based controller itself, it significantly outperforms any ISA IDE card alternative. The controller supports transfer rates up to 8MB/s, and most importantly, it completely avoids the otherwise unavoidable write-access issues that plague CF-IDE adapters connected to ISA IDE controllers when operating at 25MHz or above - a significant advantage.
Additionally, an unexpected benefit emerged from being unable to utilize the second VLB slot - the simplified physical layout created more clearance around the processor, improving options for CPU cooling solutions.
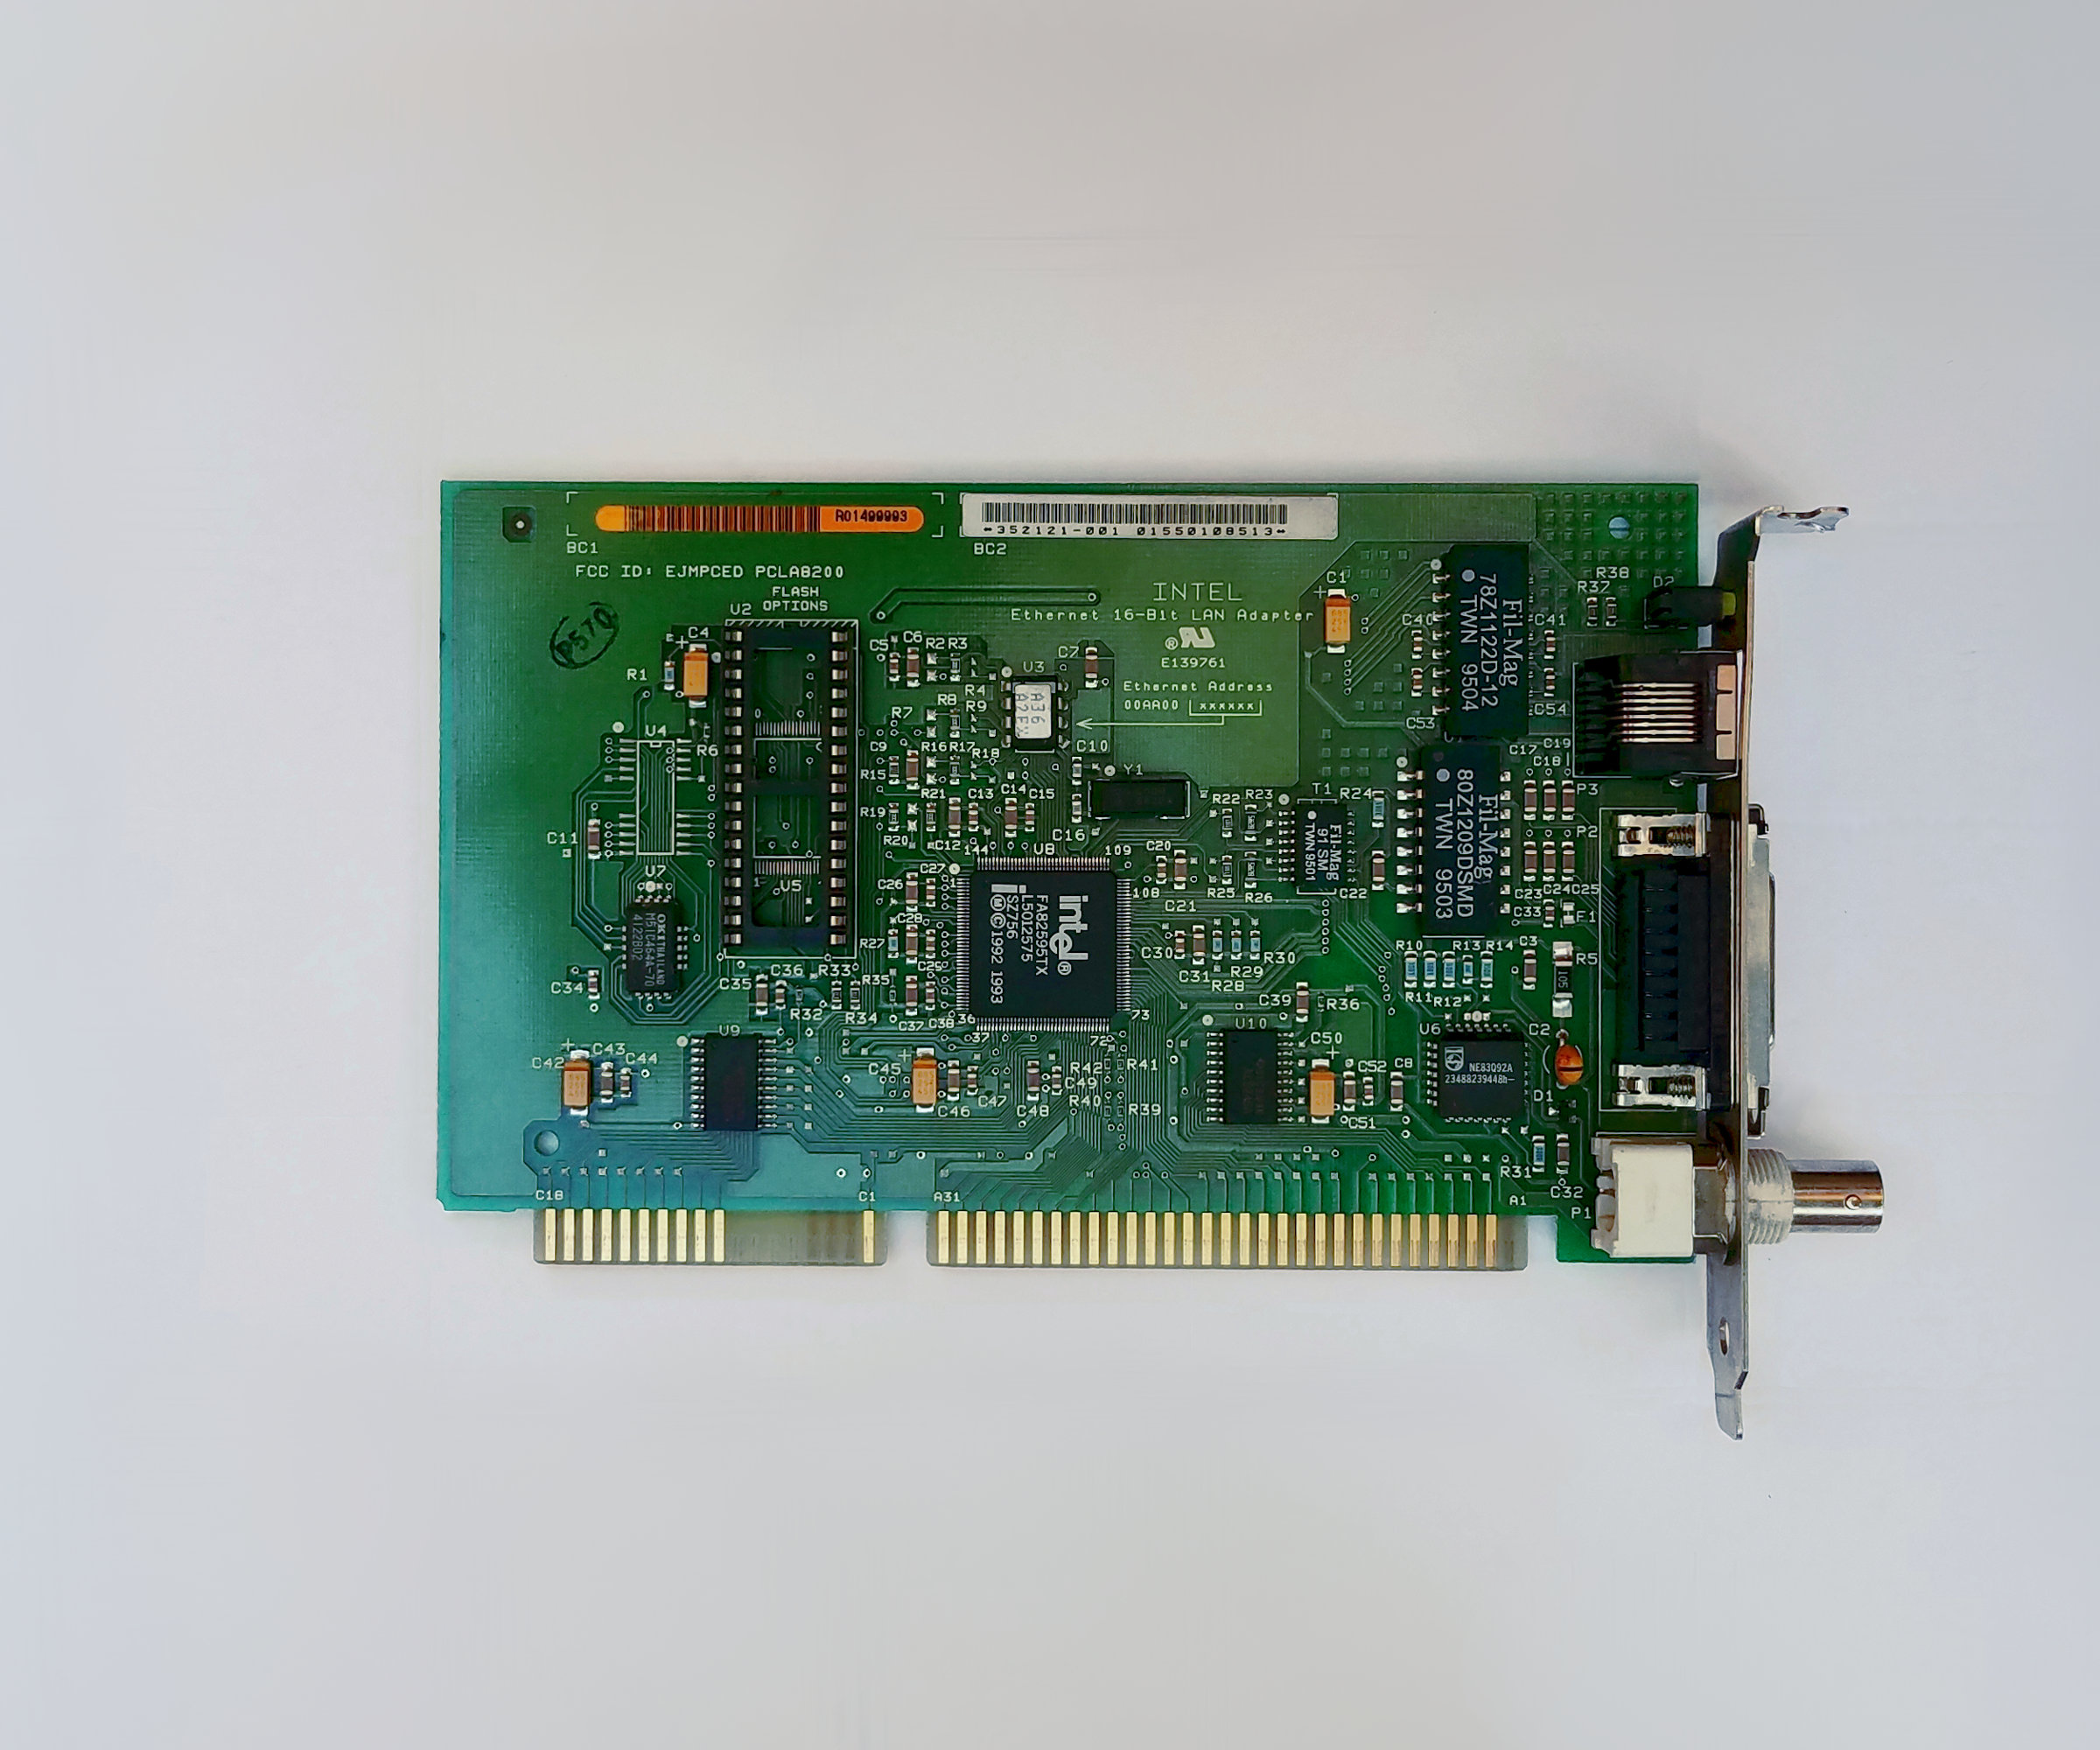
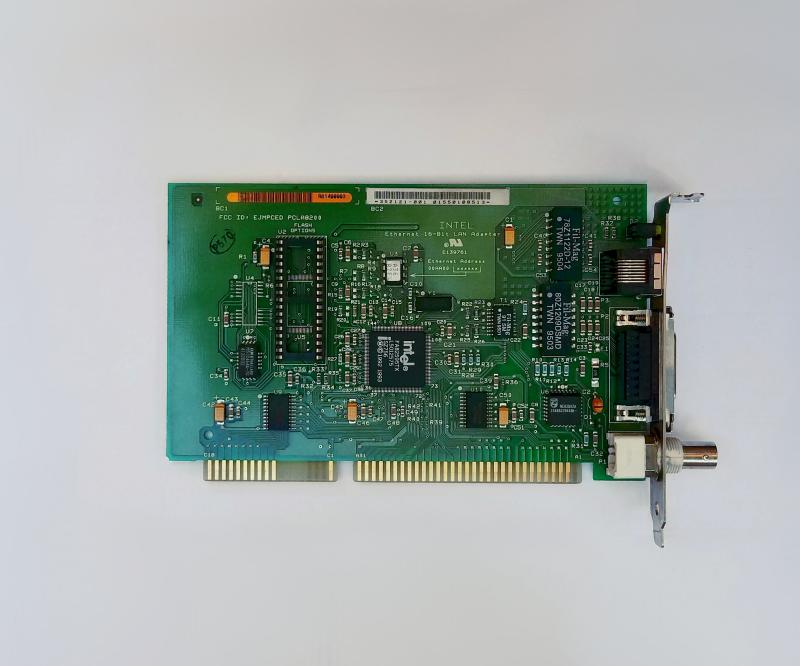
network adapter - Intel Ethernet 16-Bit LAN Adapter FA82595TX:
A standard ISA network controller. Works fine. Nothing more to add.
CDRW drive - iOmega ZIPCD384int:
I needed to select among various optical drives for this build.
The primary criteria was to find a drive with a color closely matching the retrobrighted front panel of the computer case, while also avoiding newer models manufactured after 2000. I chose an 8x/4x/32x device that color-matched the case and the Alaris badge i put on it (pictures below). While this solved the appearance problem this particular drive hangs the system during POST if connected to the same ribbon cable going to the CF-IDE adapter. The motherboard offers only one IDE connector, so it made sense to steer towards sound card offering a standard IDE interface and that's why i switched from SoundBlaster Pro 2 to ESS1869. It affects the cabling feng-shui inside the case but for now will do.
3.5" floppy drive:
Some generic drive. Works fine. Nothing more to say.
cabling and drives location:
I had originally intended to mount the CF-IDE adapter at the rear of the case, but soon encountered a practical limitation - with only a single IDE connector available on the motherboard, the ribbon cable simply wouldn't stretch far enough to connect all three required points - the onboard IDE connector (positioned in the middle of the case), the CF-IDE adapter (planned for the rear location), and the CD-RW drive (installed in the front bay). Also, I wanted to remove the 3.5" floppy drive bay entirely, as its position obscured significant portions of the motherboard, limiting both visibility and access.
My initial plan was to place the CF-IDE adapter at the back of the case, but i realized that with a single IDE connector only the cable will not be long enough to reach the 3 contact points - middle of the case the on-board IDE connector, the CF-IDE adapter on the back and the CDRW drive in the front. Additionally i wanted to remove the 3.5" floppy bay as it obscured too much from the motherboard.
To resolve these issues, I designed a custom 3D-printed mounting bracket that accommodates the optical drive, floppy drive, and CF-IDE adapter in a single consolidated arrangement. This integrated assembly fits neatly into the 5.25-inch drive bay positioned adjacent to the optical drive, reducing the cable clutter.
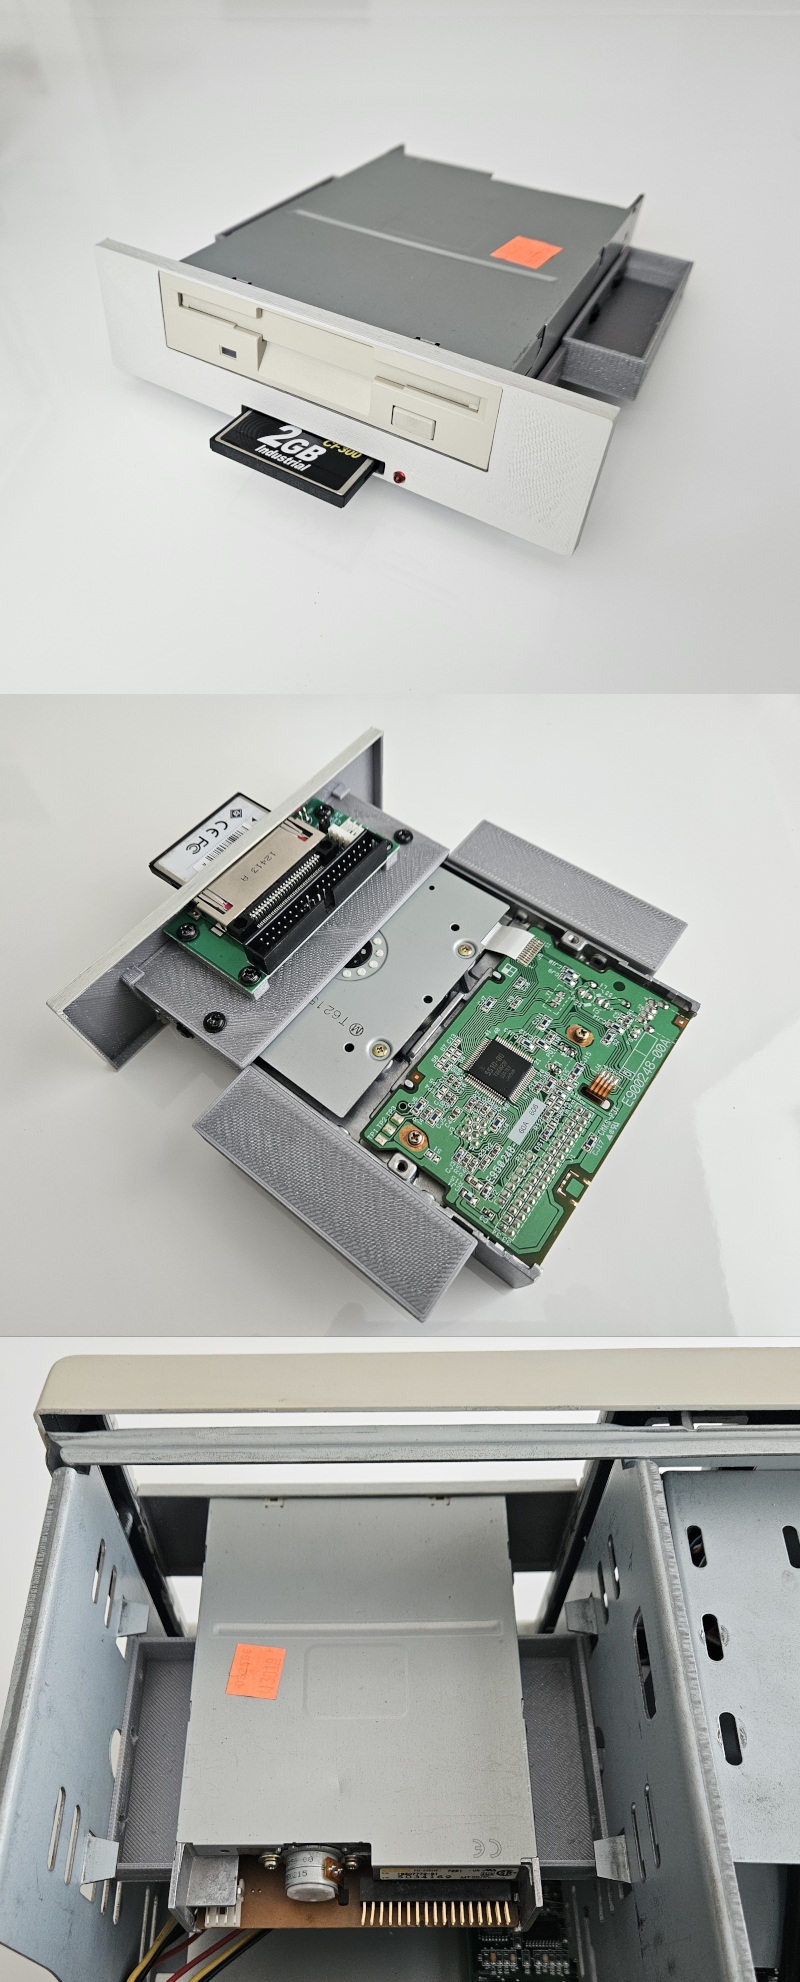
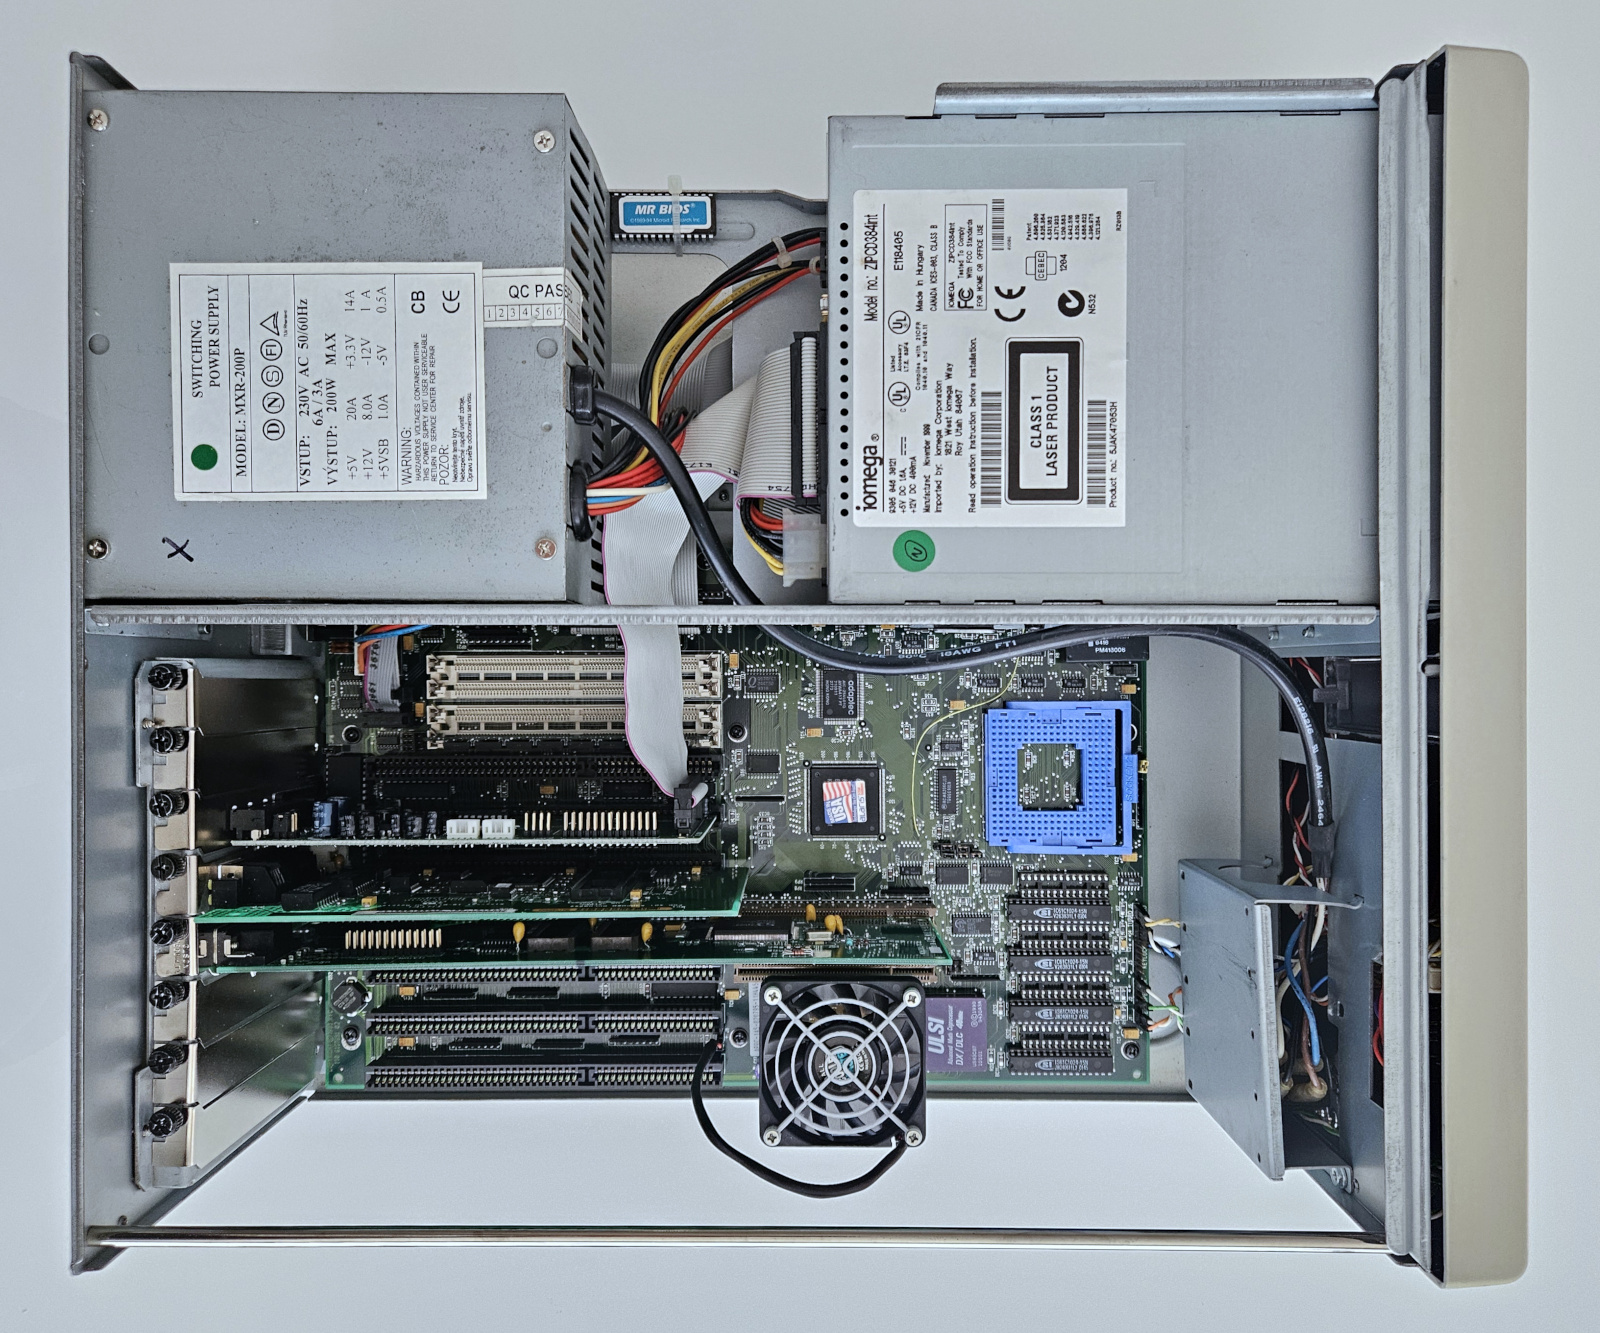
And this is how the computer ended up looking on the inside:

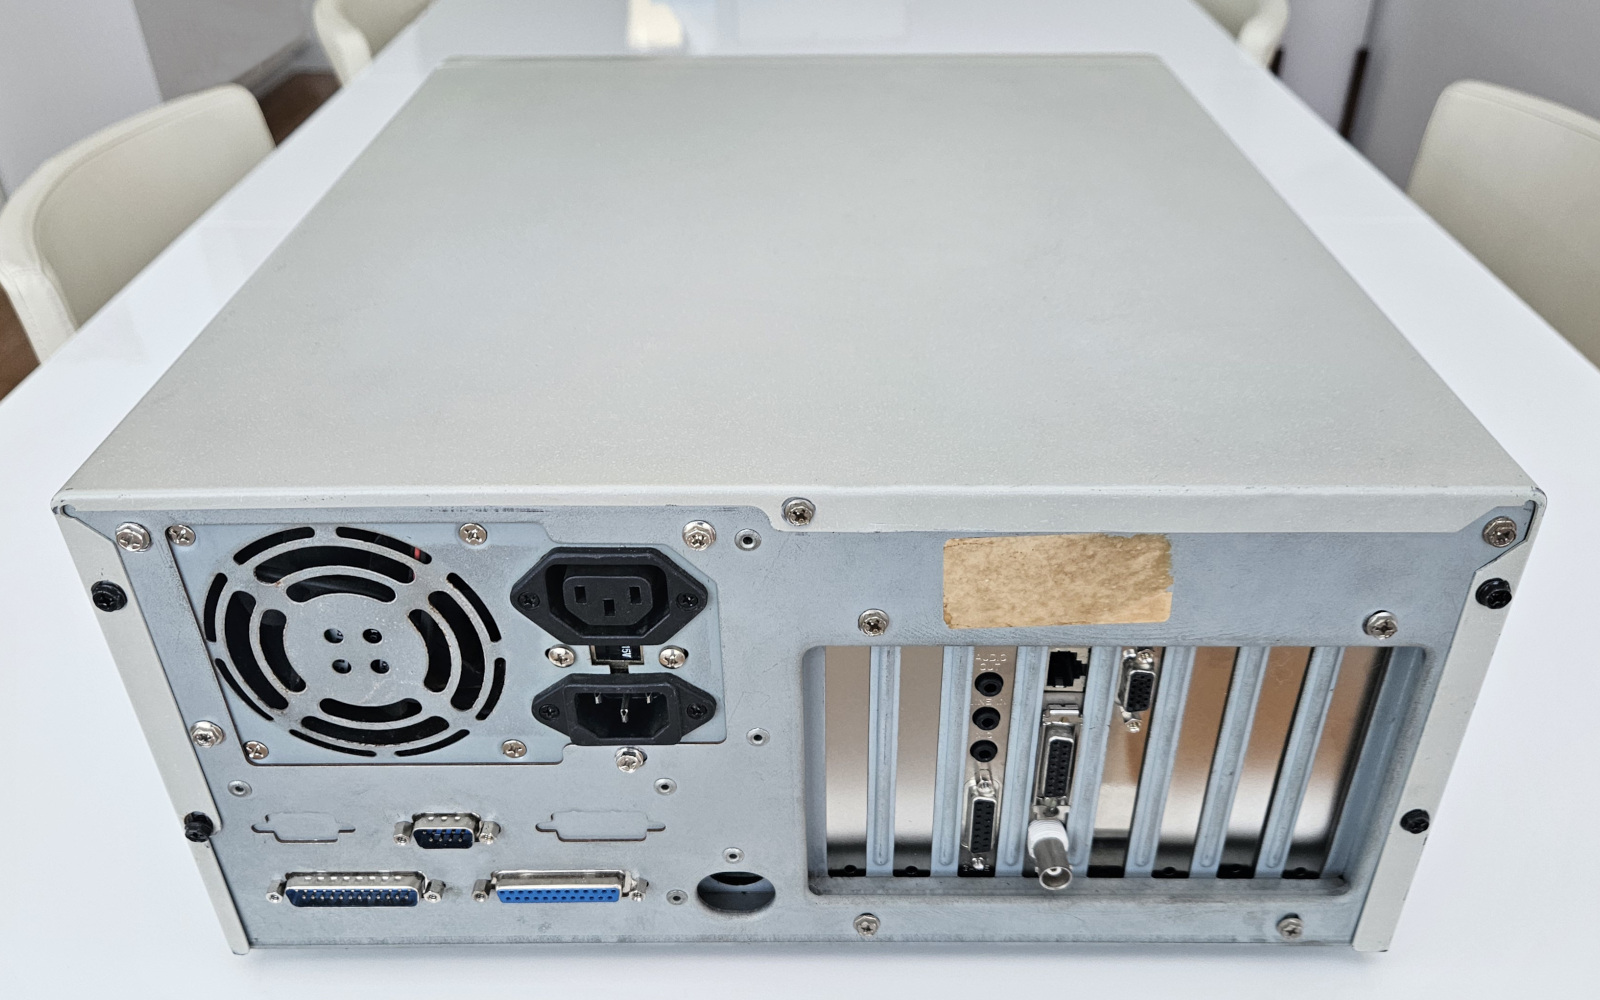
case - unknown brand/model:
The computer case I acquired from the UK seller bears a notable resemblance to the original Alaris Cougar case shown in the photograph at the beginning of this post. This similarity isn't particularly remarkable, considering the relatively standardized design of desktop cases from this era.
The case had developed significant yellowing-comparable to the color of Swiss cheese-and required restoration. My first attempt involved applying acrylic paint, which ended up looking horrible. Scrubbed it and opted for the traditional retrobrighting.
This involved submerging the front panel in a bath of hydrogen peroxide with powerful UV lights positioned above for approximately 36 hours. The outcome proved quite satisfactory. For reference - the CD-ROM drive panel has the same color of the case front panel before the retrobrighting.

After addressing that major aesthetic concern, I rigged the LED speed display with dynamic jumpering, allowing it to properly display the 50/100MHz frequencies the system can run on, depending on the selected TURBO mode.

Oiled the 3 buttons with W4 lubricant as they were qaite sticky.
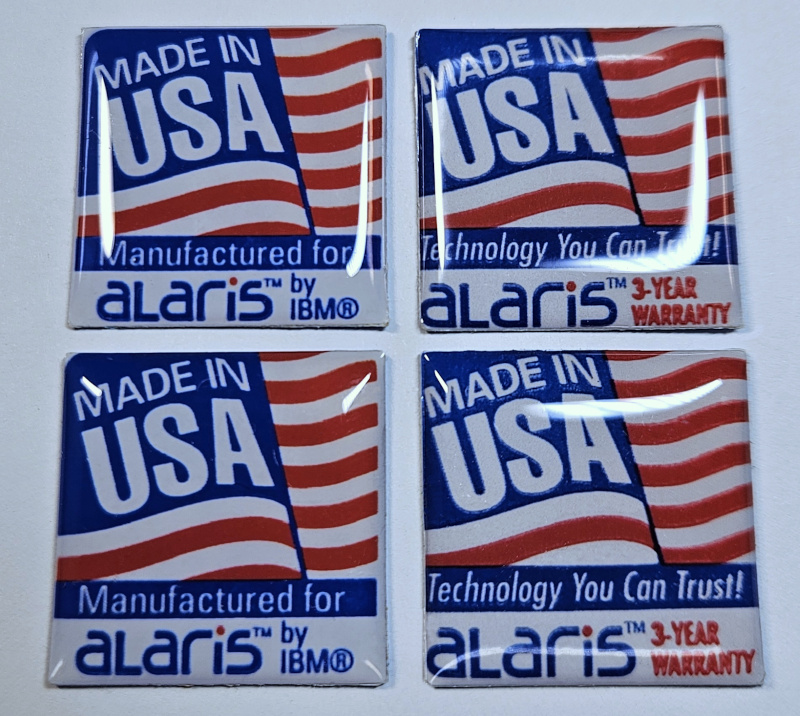
Then onto the badge. Every beige PC case has to have a badge after all.
Prepared two different designs. Carefully photoshopped and printed on glossy photo paper. Clear epoxy stickers on the front and double-sided tape on the back.
Selected the design on the right side for the case as it is better fit for it. The design on the left is more appropriate for the motherboard itself.
3D Printed the 3.5" floppy bay cover.
Color matched at Home Depot the front case color. Selected a paint with "egg shell" shine and painted the 3D printed elements.
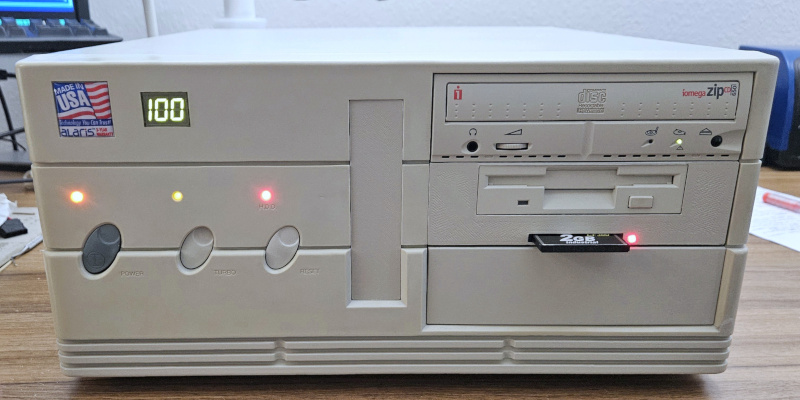
And here is the end result:


Spent quite a bit of time contemplating about the color and intensity of the LED lights. This is what i ended up with. Disco!
Upon multiple consultations with my spiritual adviser Feipoa about the exterior appearance of the computer i am going to rearrange the looks by moving the CF-IDE adapter on the back and the 3.5" floppy drive to the corresponding bay. Leaving this task for the near future. Will update the post once done.
---
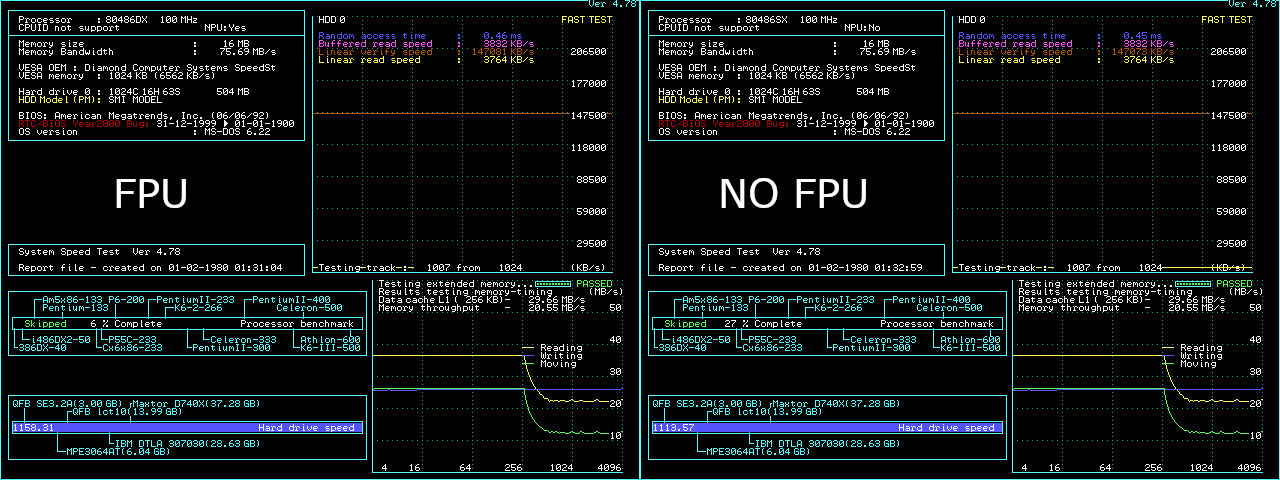
This represents the latest chapter in my ongoing "fastest 386 in the west" quest. In terms of raw performance, this system can be challenged only by the 110MHz MSI MS-3124, which maintains a slight edge in certain FPU-intensive benchmarks where its additional 10MHz to CPU and 5MHz to FPU give it an edge.
But considering the practical applications of these vintage systems - where protein folding simulations are hardly the priority, as i joked in a previous post - the metrics that matter are on interactive DOS graphics performance. In this area, the Alaris Cougar II with its 50MHz FSB, 100MHz CPU, zero wait states, VLB graphics and IDE controller, distinguishes itself as the highest watermark so far.
Speedsys:

A test run captured on video.
(notice the repetitive test for writing into a file - no write-access issues with CF-IDE adapters - finally!)
The system feels and behaves great. Fully stable, fully functional, very responsive, yet not overly responsive to feel like a post-386 machine.
Extensive testing has been conducted to confirm complete stability. The sole issue encountered thus far, aside from the previously noted soft-reset problem, involves Mortal Kombat 1. Specifically, if sound is initialized via UNISOUND or ESS initialization utilities and CTCHIP34.EXE is activated, the game will freeze at startup. The workaround is to avoid running CTCHIP34.EXE.
BENCHMARK RESULTS